gani
Administrator
Configuring IPv4 Static Routes
Bài viết này sẽ hướng dẫn cấu hình static route cho Checkpoint và sử dụng IP Reachability Detection để chuyển route khi không monitor được IP chỉ định.
Mô hình triển khai
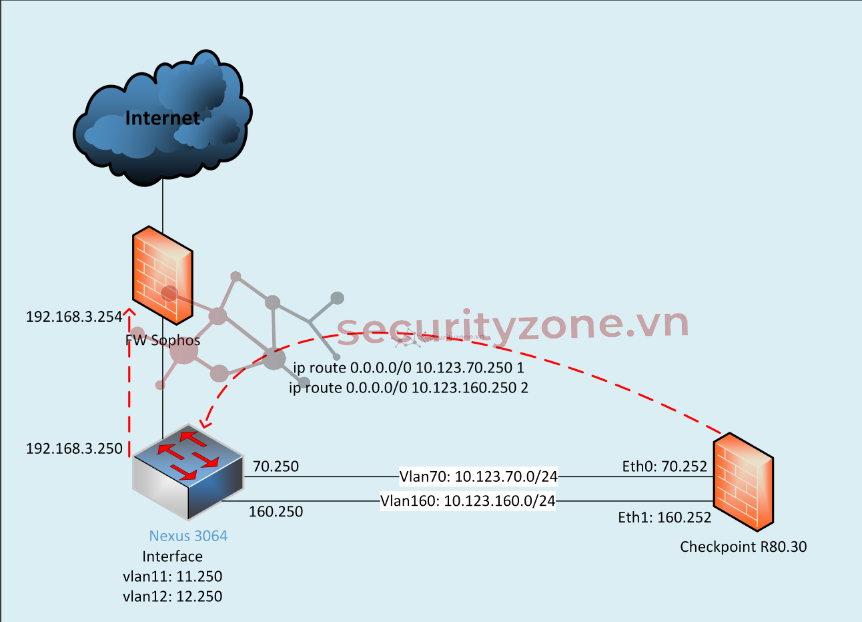
Mục tiêu:
Các bước cấu hình:
Cấu hình bằng giao diện
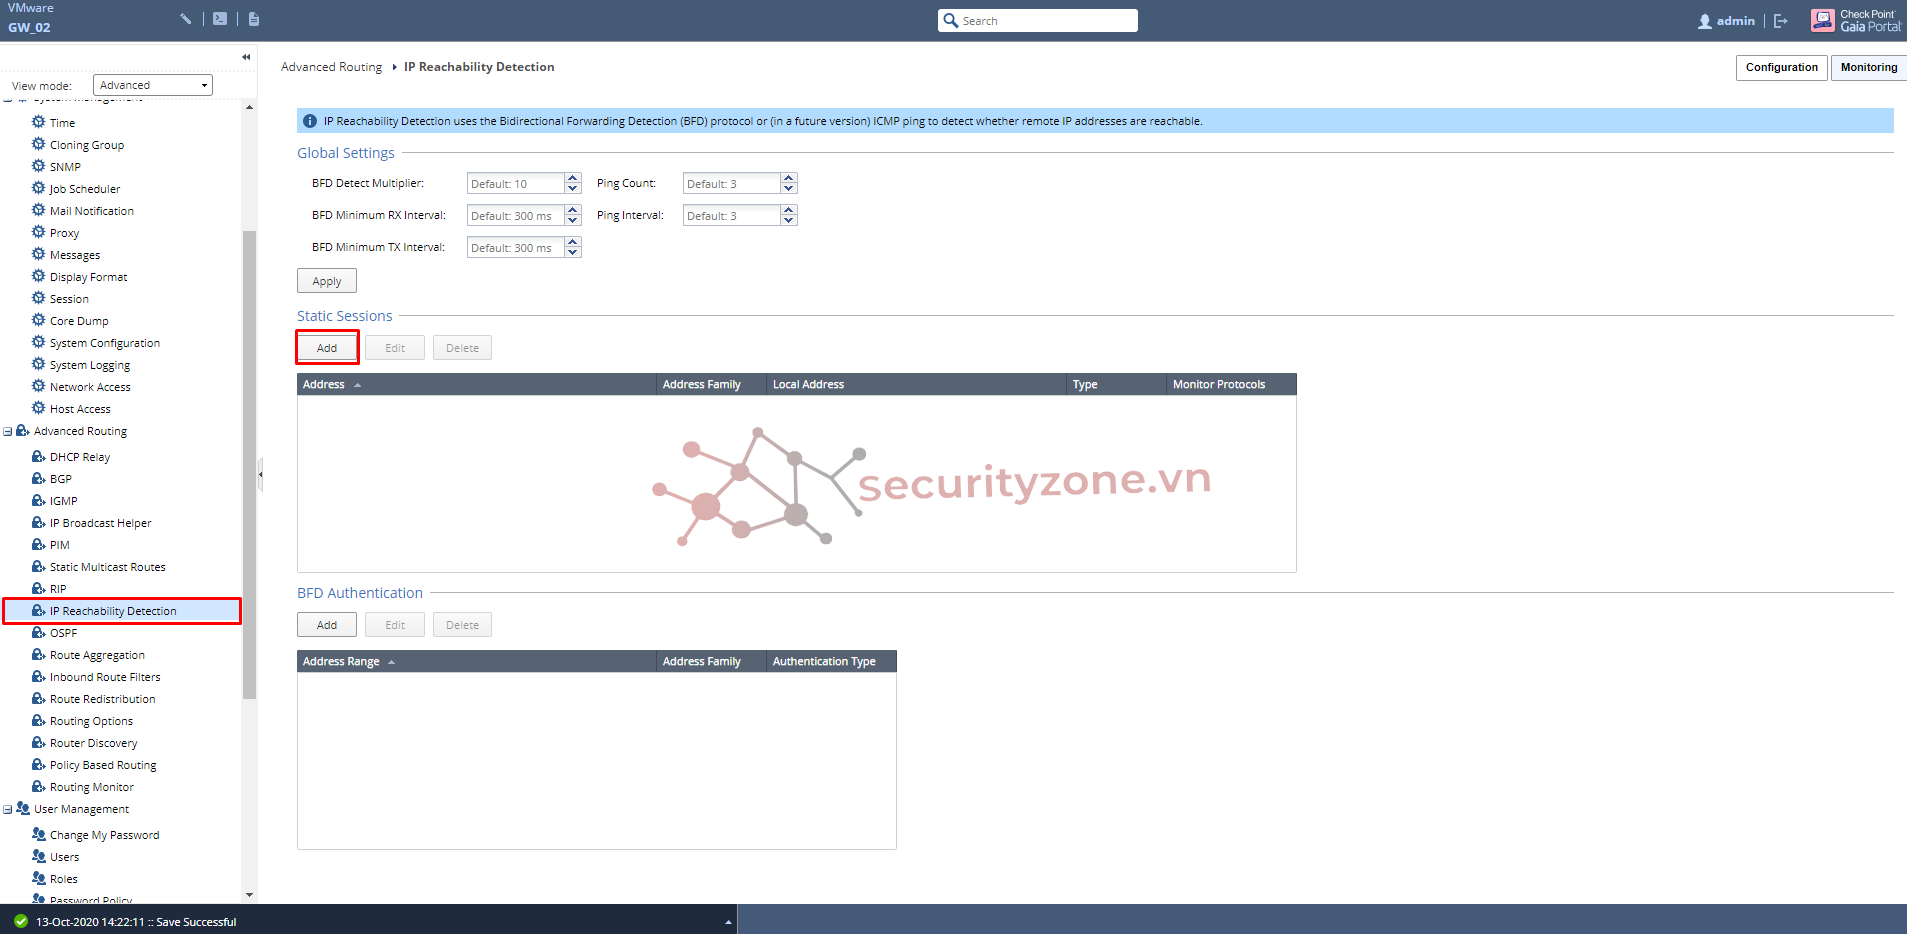
Lúc này màn hình sẽ hiển thị như hình bên dưới, tiếp tục chọn Add để thêm các IP cần monitor
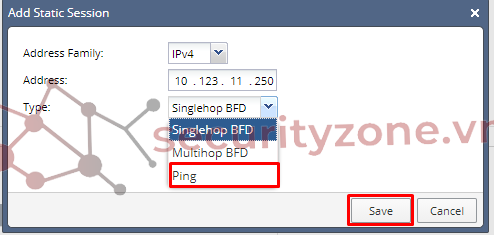
Sau khi click vào Add sẽ xuất hiện box này. Điền thông tin IP và ở bài viết này mình sẽ chọn Type Ping
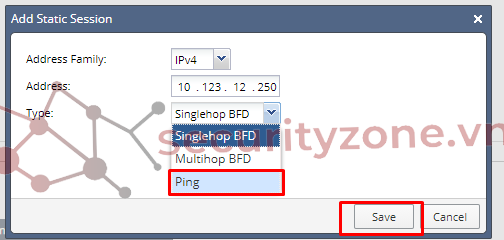
Tiếp tục với IP thứ hai
Sau khi đã Add các IP cần monitor, thông tin sẽ được hiển thị như bên dưới

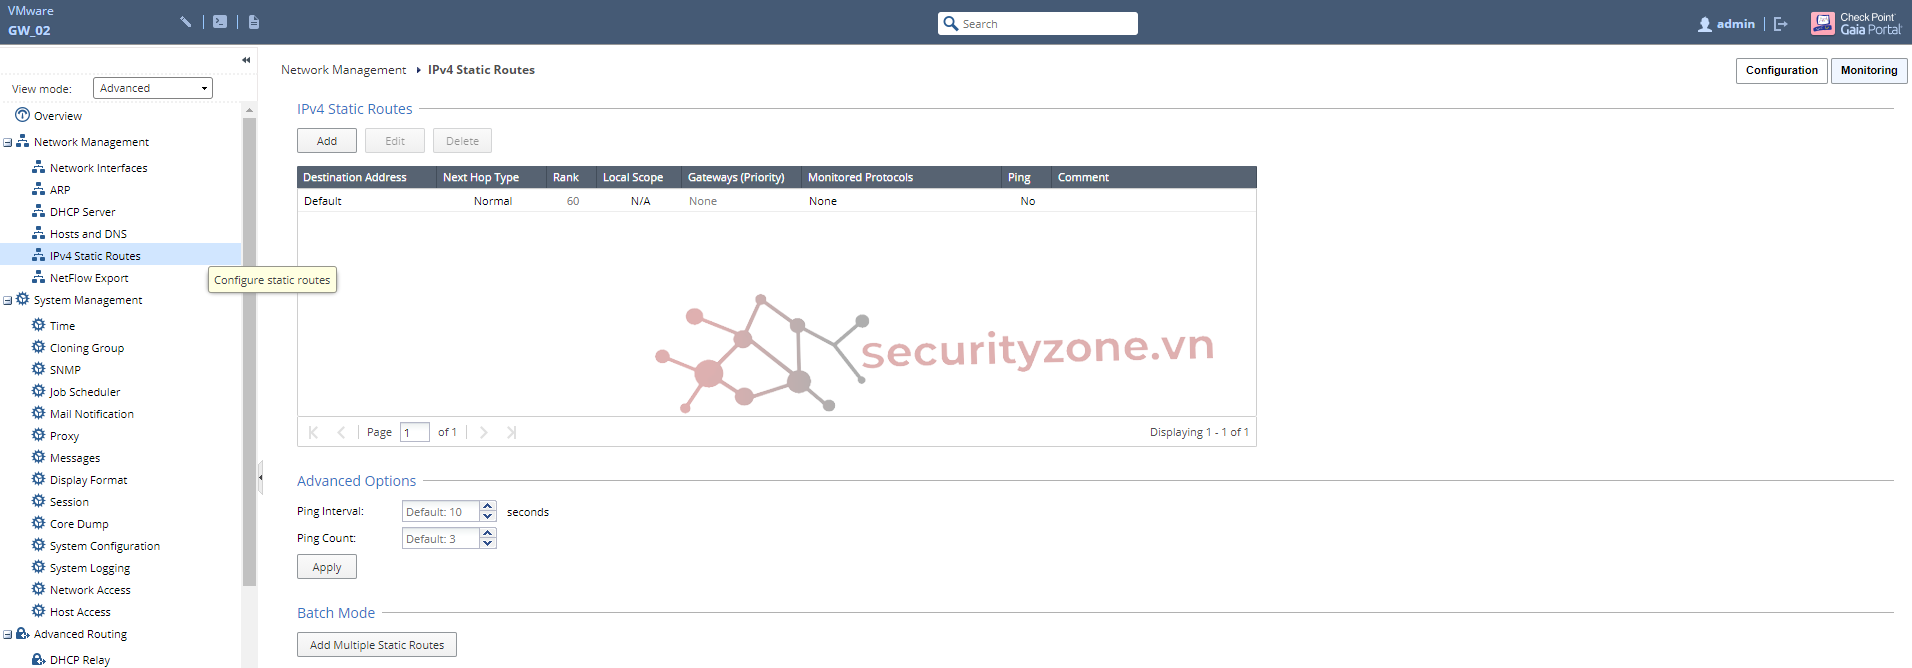
Click vào route cần cấu hình và chọn Edit hoặc double click vào route đó
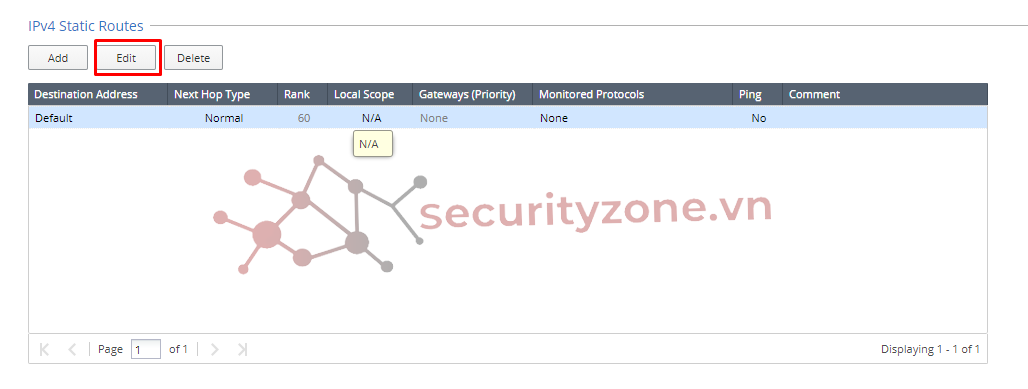
Sau khi nhấn Edit thì sẽ xuât hiện box này, điền thông tin cấu hình route vào box
Rank: là độ ưu tiên giữa các route. Default là 60 có thể thay đổi - ở đây mình để là 10
Comment: description cho route để dễ quản lí cũng như troubleshoot
Tiếp theo click vào Add Gateway - ở bài viết này mình chọn GW là IP Address
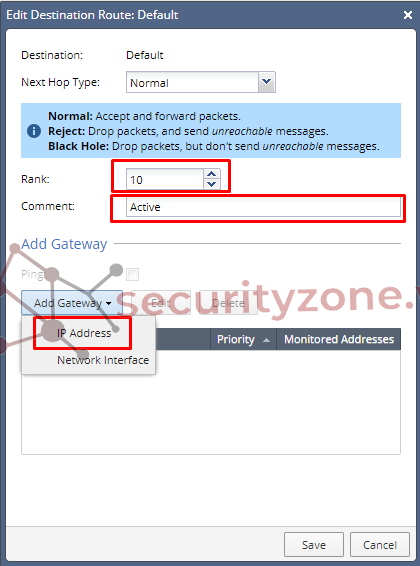
Điền thông tin GW vào
Priority: là độ ưu tiên giữa các gw cùng route - ở bài viết này do vlan 70 là chạy chính nên mình để Prio là 1
Tiếp tục chọn Add để thêm 2 IP monitor đã cấu hình ở trên
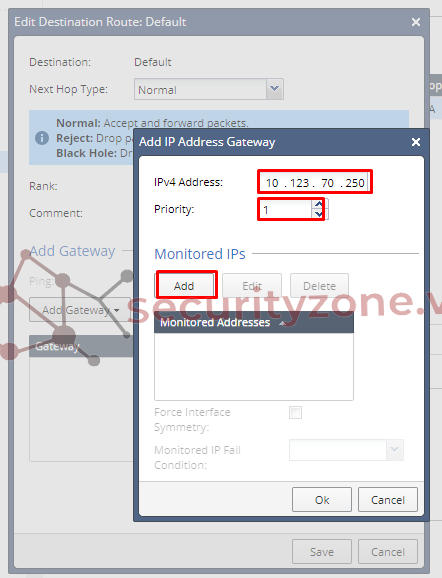
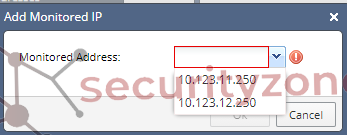
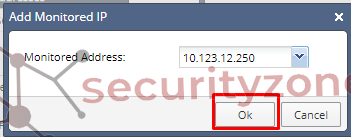
Sau khi click Add ta chọn 2 IP đã được cấu hình và click OK
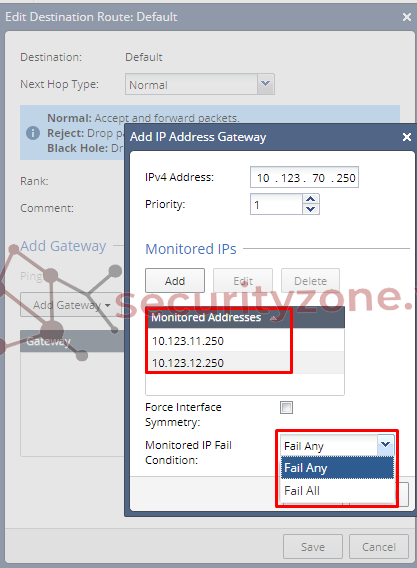
Sau khi đã thêm 2 IP monitor thì sẽ hiển thị như sau
Tiếp theo ta chọn phương thức monitor
Force Interface Symmetry: là tùy chọn cho phép IP monitor thuộc Asymmetric Network. Ở bài viết này do mô hình của mình là Symmetric traffic nên mình không chọn
Monitored IP Fail Condition: Fail Any & Fail All. Do yêu cầu là down cả interface vlan 11 & 12 nên mình chọn Fail All
Sau khi xong đường chạy chính, ta tiếp tục add thêm đường backup như bên dưới
Click vào option Ping để xác định khả năng truy cập
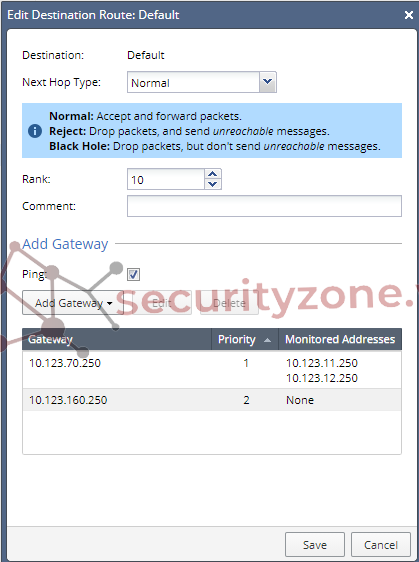
Sau khi cấu hình xong, view lại như hình bên dưới
Ngoài ra bạn có thể tùy chỉnh thời gian và số lần ping ở mục Advanced Options
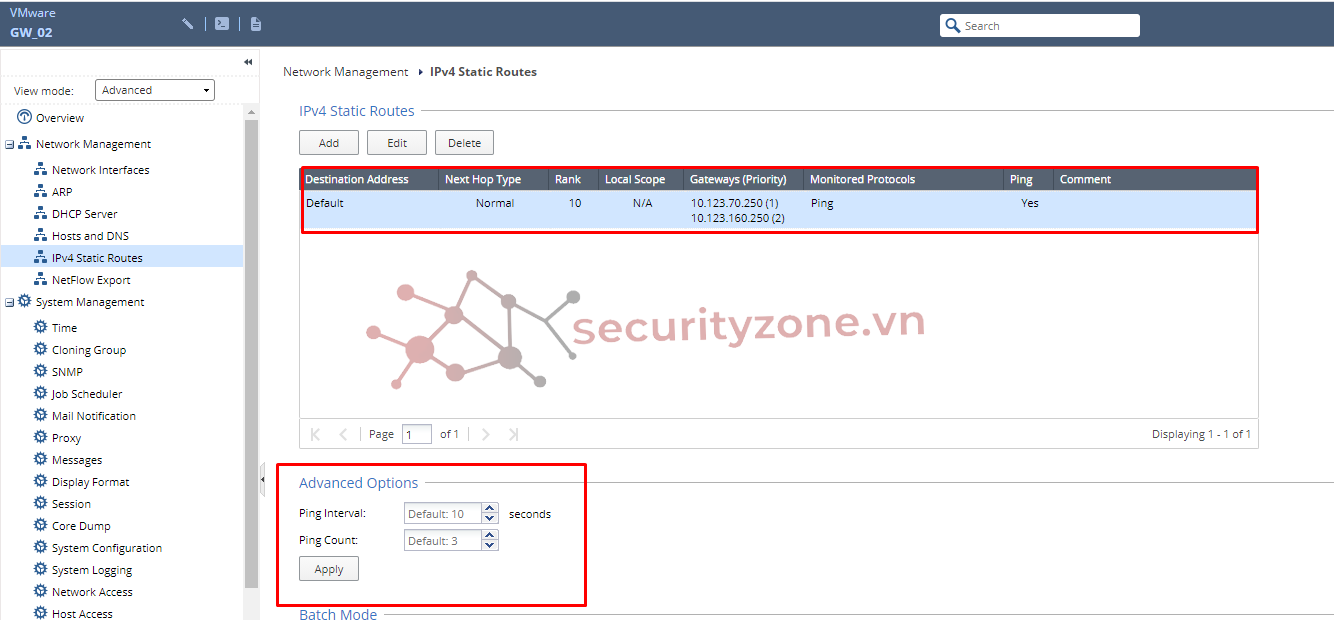
Kiểm tra trạng thái interface vlan 11 & 12 trên swtich và bảng route của Checkpoint
Hiện tại 2 interface vlan đều UP và route của Checkpoint đang trỏ bằng đường chính vlan 70
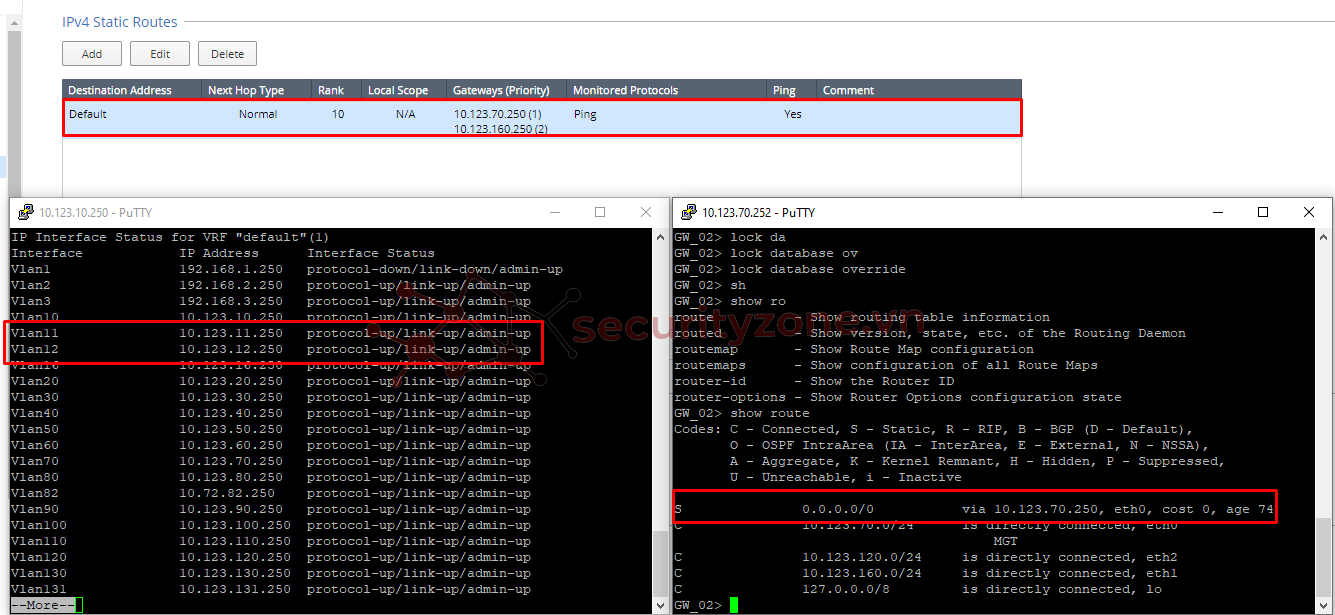
Ta thực hiện shut interface vlan 11 và kiểm tra bảng route của Checkpoint
Lúc này interface vlan 11 DOWN, interface vlan 12 UP chưa đủ điều kiện (Fail All) để chuyển route nên Checkpoint vẫn chạy bằng đường chính vlan 70
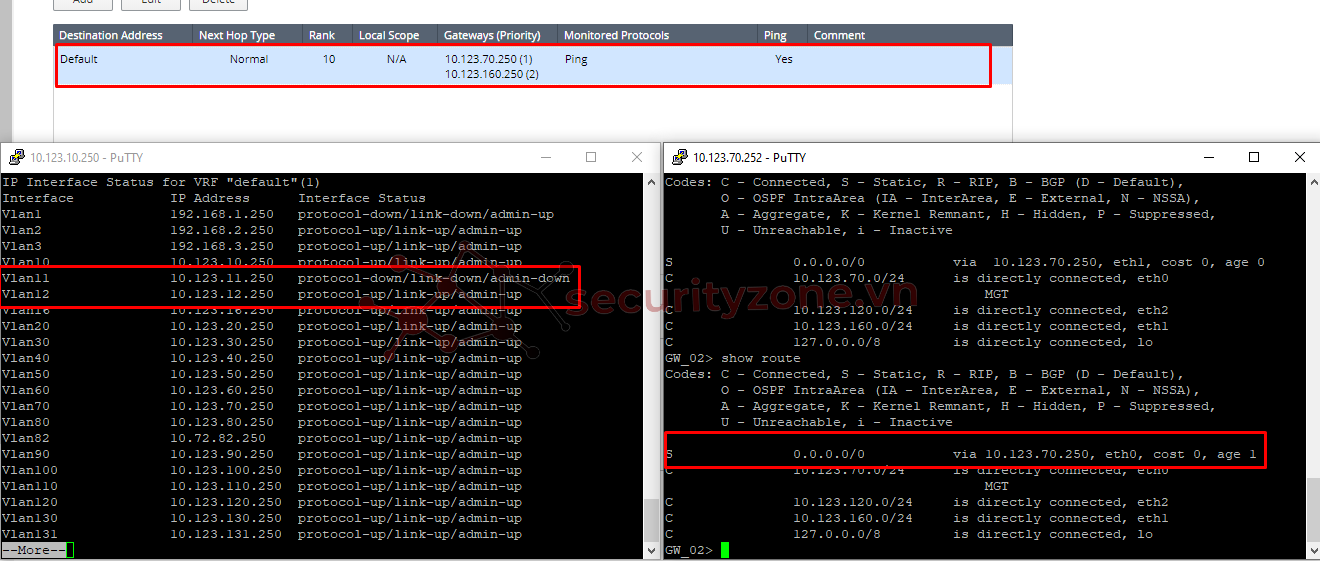
Thực hiện shutdown cả 2 interface vlan của swtich và kiểm tra bảng route của checkpoint
Lúc này 2 interface vlan của switch đã DOWN đồng nghĩa Checkpoint không Ping đến được 2 IP monitor nên route chuyển sang chạy đường backup vlan 160
Cấu hình bằng CLI:
Summary:
Configuring IPv4 Static Route in Gaia Portal
Configure a specific static IPv4 route in Gaia Clish
NOTE: Để xóa route thì dùng lệnh
CLI Parameters
Hy vọng bài viết sẽ hữu ích với các bạn, rất vui nếu nhận được ý kiến đóng góp để bài viết hoàn thiện hơn.
Và cũng như có thắc mắc gì các bạn có thể để lại ở phần comment bên dưới.
Thanks
Bài viết này sẽ hướng dẫn cấu hình static route cho Checkpoint và sử dụng IP Reachability Detection để chuyển route khi không monitor được IP chỉ định.
Mô hình triển khai

Mục tiêu:
- Vlan 70 là đường chạy chính
- Vlan 160 là đường backup
- Khi interface vlan11 & 12 down thì Checkpoint sẽ chuyển từ route 70.250 (1) sang route 160.250 (2)
Các bước cấu hình:
Cấu hình bằng giao diện
1. Cấu hình IP cần monitor:
Login vào Checkpoint -> chọn phần View mode: Advanced -> chọn IP Reachability Detection Lúc này màn hình sẽ hiển thị như hình bên dưới, tiếp tục chọn Add để thêm các IP cần monitor

Sau khi click vào Add sẽ xuất hiện box này. Điền thông tin IP và ở bài viết này mình sẽ chọn Type Ping

Tiếp tục với IP thứ hai

Sau khi đã Add các IP cần monitor, thông tin sẽ được hiển thị như bên dưới

2. Cấu hình routing
Click vào IPv4 Static Routes để cấu hình định tuyến cho Checkpoint

Click vào route cần cấu hình và chọn Edit hoặc double click vào route đó

Sau khi nhấn Edit thì sẽ xuât hiện box này, điền thông tin cấu hình route vào box
Rank: là độ ưu tiên giữa các route. Default là 60 có thể thay đổi - ở đây mình để là 10
Comment: description cho route để dễ quản lí cũng như troubleshoot
Tiếp theo click vào Add Gateway - ở bài viết này mình chọn GW là IP Address

Điền thông tin GW vào
Priority: là độ ưu tiên giữa các gw cùng route - ở bài viết này do vlan 70 là chạy chính nên mình để Prio là 1
Tiếp tục chọn Add để thêm 2 IP monitor đã cấu hình ở trên

Sau khi click Add ta chọn 2 IP đã được cấu hình và click OK


Sau khi đã thêm 2 IP monitor thì sẽ hiển thị như sau
Tiếp theo ta chọn phương thức monitor
Force Interface Symmetry: là tùy chọn cho phép IP monitor thuộc Asymmetric Network. Ở bài viết này do mô hình của mình là Symmetric traffic nên mình không chọn
Monitored IP Fail Condition: Fail Any & Fail All. Do yêu cầu là down cả interface vlan 11 & 12 nên mình chọn Fail All

Sau khi xong đường chạy chính, ta tiếp tục add thêm đường backup như bên dưới
Click vào option Ping để xác định khả năng truy cập

Sau khi cấu hình xong, view lại như hình bên dưới
Ngoài ra bạn có thể tùy chỉnh thời gian và số lần ping ở mục Advanced Options

3. Test cấu hình
Kiểm tra trạng thái interface vlan 11 & 12 trên swtich và bảng route của Checkpoint
Hiện tại 2 interface vlan đều UP và route của Checkpoint đang trỏ bằng đường chính vlan 70

Ta thực hiện shut interface vlan 11 và kiểm tra bảng route của Checkpoint
Lúc này interface vlan 11 DOWN, interface vlan 12 UP chưa đủ điều kiện (Fail All) để chuyển route nên Checkpoint vẫn chạy bằng đường chính vlan 70

Thực hiện shutdown cả 2 interface vlan của swtich và kiểm tra bảng route của checkpoint
Lúc này 2 interface vlan của switch đã DOWN đồng nghĩa Checkpoint không Ping đến được 2 IP monitor nên route chuyển sang chạy đường backup vlan 160

Cấu hình bằng CLI:
| set ip-reachability-detection ping address 10.123.11.250 enable-ping on set ip-reachability-detection ping address 10.123.12.250 enable-ping on set static-route default nexthop gateway address 10.123.70.250 priority 1 on set static-route default nexthop gateway address 10.123.70.250 monitored-ip 10.123.11.250 on set static-route default nexthop gateway address 10.123.70.250 monitored-ip 10.123.12.250 on set static-route default nexthop gateway address 10.123.70.250 monitored-ip-option fail-all set static-route default nexthop gateway address 10.123.160.250 priority 2 on set static-route default ping on set static-route default rank 10 |
Summary:
Configuring IPv4 Static Route in Gaia Portal
| Step | Description | ||
|---|---|---|---|
| 1 | In the navigation tree, click Network Management > IPv4 Static Routes. | ||
| 2 | In the IPv4 Static Routes section, click Add. The Add Destination Route window opens. | ||
| 3 | In the Destination field, enter the IPv4 address of destination host, or network. | ||
| 4 | In the Subnet mask field, enter the subnet mask. | ||
| 5 | In the Next Hop Type field, select one of these:
| ||
| 6 | In the Rank field, leave the default value (60), or enter the relative rank of the IPv4 static route (an integer from 1 to 255). This value specifies the rank for the configured route when there are overlapping routes from different protocols. | ||
| 7 | Select the Local Scope option, if needed. Use this setting on a Cluster Member when the ClusterXL Virtual IPv4 address is in a different subnet than the IPv4 address of a physical interface. This lets the Cluster Member accept static routes on the subnet of the Cluster Virtual IPv4 address. To make sure that the scopelocal attribute is set correctly, run the "cat /etc/routed.conf" command. For more information, see sk92799. | ||
| 8 | In the Comment field, enter the applicable comment text (up to 100 characters). | ||
| 9 | Click Add Gateway and select one of these options:
| ||
| 10 | If you defined a next hop gateway by IP Address, you can select the Ping option, if you need to monitor next hops for the IPv4 static route with the ping. The Ping feature sends ICMP Echo Requests to make sure the next hop gateway for a static route is working. Gaia includes in the kernel forwarding table only next hop gateways, which are verified as working. When Ping is enabled, Gaia adds an IPv4 static route to the kernel forwarding table only after at least one next hop gateway is reachable. | ||
| 11 | Click Save. | ||
| 12 | In the Advanced Options section, you can configure the Ping behavior. If you changed the default settings, click Apply. |
Configure a specific static IPv4 route in Gaia Clish
| set static-route <Destination IPv4 Address> ( nếu bạn cấu hình default route thì gõ chữ default vào ) comment {"Text" | off} nexthop gateway address <IPv4 Address of Next Hop Gateway> {on | off} monitored-ip <Monitored IP Address> {on | off} monitored-ip-option {fail-all | fail-any | force-if-symmetry {on | off}} [priority <Priority>] logical <Name of Local Interface> {on | off} [priority <Priority>] blackhole reject off ping {on | off} rank <Rank> scopelocal {on | off} |
NOTE: Để xóa route thì dùng lệnh
| set static-route <Destination IPv4 Address> off |
CLI Parameters
| Parameter | Description | |
|---|---|---|
| default | Defines the default static IPv4 route. | |
| <Destination IPv4 Address> | Specifies the IPv4 address of destination host or network using the CIDR notation (IPv4 Address / Mask Length). Example: 192.168.2.0/24 You can use the default keyword instead of an IPv4 address when referring to the default route. | |
| comment {"Text" | off} | Defines of removes the optional comment for the static route.
| |
| nexthop | Defines the next hop path, which can be a gateway, blackhole, or reject. | |
| gateway | Specifies that this next hop accepts and sends packets to the specified destination. | |
| blackhole | Specifies that this next hop drops packets, but does not send ICMP unreachable packet to the traffic source. | |
| reject | Specifies that this next hop drops packets and sends ICMP unreachable packet to the traffic source. | |
| address <IPv4 Address of Next Hop Gateway> | Specifies the IPv4 address of the next hop gateway. | |
| logical <Name of Local Interface> | Identifies the next hop gateway by the name of the local interface that connects to it. Use this option only if the next hop gateway has an unnumbered interface. | |
| monitored-ip <Monitored IP Address> {on | off} | Remote IPv4 address to monitor for the next hop gateway. Monitors IP address(es) configured with the "ip-reachability-detection". The next hop gateway becomes usable with respect to reachability of IP address(es) reported from the "ip-reachability-detection". | |
| monitored-ip-option {fail-all | fail-any | force-if-symmetry {on | off}} | Set failure condition and flavor for the configured monitored IP address(es).
| |
| priority <Priority> | Defines which gateway to select as the next hop when multiple gateways are configured. The lower the priority, the higher the preference - priority 1 means the highest preference, and priority 8 means the lowest preference. You can define two or more paths with the same priority to specify a backup path with equal priority. A next hop gateway with no priority configured is preferred over a next hop gateway with priority configured | |
| nexthop ... on | Adds the specified next hop gateway. | |
| nexthop ... off | Deletes the specified next hop gateway. If you specify a next hop gateway, only the specified path is deleted. If you do not specify a next hop gateway, the route and all related paths are deleted. | |
| off | Removes the static route. | |
| ping {on | off} | Enables (on) or disables (off) the ping of specified next hop gateways for IPv4 static routes. The Ping feature sends ICMP Echo Requests to make sure the next hop gateway for a static route is working. Gaia includes in the kernel forwarding table only next hop gateways, which are verified as working. When Ping is enabled, Gaia adds an IPv4 static route to the kernel forwarding table only after at least one next hop gateway is reachable. To configure the ping behavior, run:
| |
| rank <Rank> | Selects a route, if there are many routes to a destination that use different routing protocols. The route with the lowest rank value is selected. Use the rank keyword in place of the nexthop keyword with no other parameters. Accepted values are: default (60), integer numbers from 0 to 255. In addition, see this command: "set protocol-rank protocol <Rank>" | |
| scopelocal {on | off} | Defines a static route with a link-local scope. Use this setting on a Cluster Member, when the ClusterXL Virtual IPv4 address is in a different subnet than the IPv4 address of a physical interface. This lets the Cluster Member accept static routes on the subnet of the Cluster Virtual IPv4 address. To make sure that the scopelocal attribute is set correctly, run the "cat /etc/routed.conf" command. For more information, see sk92799. |
Hy vọng bài viết sẽ hữu ích với các bạn, rất vui nếu nhận được ý kiến đóng góp để bài viết hoàn thiện hơn.
Và cũng như có thắc mắc gì các bạn có thể để lại ở phần comment bên dưới.
Thanks
Đính kèm
Sửa lần cuối:
Bài viết liên quan
Bài viết mới
