Kiến trúc:
- Nhiệm vụ: chủ động theo dõi hệ thống (log file, file integrity, cấu hình, sự kiện hệ thống) và gửi dữ log về cho trình quản lý trung tâm Wazuh Manager.
- Tương tác: nhận policy (cấu hình) từ Manager để biết cần phải thu thập gì và giám sát như thế nào.
- Nhiệm vụ: Quản lý tất cả các agent, cung cấp Policy cho các agent, tiếp nhận log từ agent, forward log đến vector.
- Tương tác: Nó gửi toàn bộ dữ liệu log tới một thành phần tiếp theo.
- Nhiệm vụ: Nó hoạt động như một tầng trung gian (broker/shipper) để thu thập, chuyển đổi, và định tuyến dữ liệu.
- Vai trò trong mô hình: Nhận dữ liệu từ Wazuh Manager. Nó có thể thực hiện các tác vụ như:
- Buffering: Tạo bộ đệm để giữ dữ liệu nếu OpenSearch bị chậm hoặc gặp sự cố, tránh mất mát dữ liệu.
- Transformation: Chuyển đổi, lọc bớt, hoặc làm giàu thêm dữ liệu trước khi gửi đi.
- Routing: Định tuyến dữ liệu. Ví dụ, nó có thể gửi tất cả log đến OpenSearch.
- Nhiệm vụ: Đây là nơi lưu trữ cuối cùng của dữ liệu.
- Vai trò trong mô hình: Nó tiếp nhận dữ liệu từ Vector. Sau đó, nó lập index dữ liệu.
1. Cài Wazuh Manager
| sudo apt-get install gnupg apt-transport-https curl -s https://packages.wazuh.com/key/GPG-KEY-WAZUH | gpg --no-default-keyring --keyring gnupg-ring:/usr/share/keyrings/wazuh.gpg --import && chmod 644 /usr/share/keyrings/wazuh.gpg echo "deb [signed-by=/usr/share/keyrings/wazuh.gpg] https://packages.wazuh.com/4.x/apt/ stable main" | tee -a /etc/apt/sources.list.d/wazuh.list apt-get update apt-get -y install wazuh-manager apt-get -y install filebeat |
Tải file config của filebeat:
| curl -so /etc/filebeat/filebeat.yml https://packages.wazuh.com/4.12/tpl/wazuh/filebeat/filebeat.yml |
| systemctl daemon-reload systemctl enable wazuh-manager systemctl start wazuh-manager |
Chỉnh cấu hình file /var/ossec/etc/ossec.conf:
| <alerts_log>no</alerts_log> <logall>yes</logall> <logall_json>yes</logall_json> |
Tắt alerts_log để không cho Wazuh manager xử lý các raw log biến nó thành alert vì mục đích ban đầu là thu thập log về Opensearch.
File log nằm ở /var/ossec/logs/archives/archives.log và /var/ossec/logs/archives/archives.json.
2. Cài Opensearch + Vector
Cài docker:
| for pkg in docker.io docker-doc docker-compose docker-compose-v2 podman-docker containerd runc; do sudo apt-get remove $pkg; done sudo apt-get update sudo apt-get install ca-certificates curl sudo install -m 0755 -d /etc/apt/keyrings sudo curl -fsSL https://download.docker.com/linux/ubuntu/gpg -o /etc/apt/keyrings/docker.asc sudo chmod a+r /etc/apt/keyrings/docker.asc echo \ "deb [arch=$(dpkg --print-architecture) signed-by=/etc/apt/keyrings/docker.asc] https://download.docker.com/linux/ubuntu \ $(. /etc/os-release && echo "${UBUNTU_CODENAME:-$VERSION_CODENAME}") stable" | \ sudo tee /etc/apt/sources.list.d/docker.list > /dev/null sudo apt-get update sudo apt-get install docker-ce docker-ce-cli containerd.io docker-buildx-plugin docker-compose-plugin sudo usermod -aG docker $USER newgrp docker sudo apt install python3.12-venv -y python3 -m ensurepip --upgrade |
Tạo file docker-compose.yml:
| version: '3.8' services: opensearch-node1: image: opensearchproject/opensearch:3 container_name: opensearch-node1 environment: - cluster.name=opensearch-cluster - node.name=opensearch-node1 - discovery.seed_hosts=opensearch-node1,opensearch-node2 - cluster.initial_cluster_manager_nodes=opensearch-node1,opensearch-node2 - bootstrap.memory_lock=true - OPENSEARCH_JAVA_OPTS=-Xms512m -Xmx512m - OPENSEARCH_INITIAL_ADMIN_PASSWORD=Chinh123@ ulimits: memlock: soft: -1 hard: -1 nofile: soft: 65536 hard: 65536 volumes: - opensearch-data1:/usr/share/opensearch/data networks: - opensearch-net ports: - "9200:9200" - "9600:9600" healthcheck: test: ["CMD", "curl", "-f", "-sS", "-u", "admin:Chinh123@", "--insecure", "https://localhost:9200/_cluster/health"] interval: 10s timeout: 5s retries: 10 opensearch-node2: image: opensearchproject/opensearch:3 container_name: opensearch-node2 environment: - cluster.name=opensearch-cluster - node.name=opensearch-node2 - discovery.seed_hosts=opensearch-node1,opensearch-node2 - cluster.initial_cluster_manager_nodes=opensearch-node1,opensearch-node2 - bootstrap.memory_lock=true - OPENSEARCH_JAVA_OPTS=-Xms512m -Xmx512m - OPENSEARCH_INITIAL_ADMIN_PASSWORD=Chinh123@ ulimits: memlock: soft: -1 hard: -1 nofile: soft: 65536 hard: 65536 volumes: - opensearch-data2:/usr/share/opensearch/data networks: - opensearch-net healthcheck: test: ["CMD", "curl", "-f", "-sS", "-u", "admin:Chinh123@", "--insecure", "https://localhost:9200/_cluster/health"] interval: 10s timeout: 5s retries: 10 opensearch-dashboards: image: opensearchproject/opensearch-dashboards:3 container_name: opensearch-dashboards environment: OPENSEARCH_HOSTS: '["https://opensearch-node1:9200","https://opensearch-node2:9200"]' ports: - "5601:5601" networks: - opensearch-net depends_on: opensearch-node1: condition: service_healthy opensearch-node2: condition: service_healthy vector: image: timberio/vector:nightly-2025-08-22-debian container_name: vector volumes: - ./vector.yaml:/etc/vector/vector.yaml:ro - /var/ossec/logs/archives:/var/log/wazuh:ro - vector-data:/vector-data-dir networks: - opensearch-net ports: - "6000:6000" - "8686:8686" depends_on: opensearch-node1: condition: service_healthy opensearch-node2: condition: service_healthy networks: opensearch-net: volumes: opensearch-data1: opensearch-data2: vector-data: |
Tạo file vector.yaml đây là file cấu hình cho vector:
| data_dir: "/vector-data-dir" api: enabled: true address: "0.0.0.0:8686" sources: wazuh_logs: type: file include: - "/var/log/wazuh/archives.json" ignore_older: 0 transforms: parse_json_message: type: remap inputs: ["wazuh_logs"] source: | . = parse_json!(.message) ensure_index_and_tags: type: remap inputs: ["parse_json_message"] source: | .index_name = "wazuh-manager" .received_at = now() if !exists(.source_type) { .source_type = "agent" } sinks: opensearch_sink: type: elasticsearch inputs: ["ensure_index_and_tags"] endpoints: - "https://opensearch-node1:9200" - "https://opensearch-node2:9200" api_version: "v7" bulk: index: "{{ index_name }}" request: concurrency: 2 auth: strategy: basic user: admin password: "Chinh123@" tls: verify_certificate: false verify_hostname: false console_out: type: console inputs: ["ensure_index_and_tags"] encoding: codec: json |
Sau đó chạy: docker compose up -d
3. Cài Wazuh Agent cho thiết bị Linux
Tạo group cho Linux agent trên Wazuh Manager:
| /var/ossec/bin/agent_groups -a -g linux_agent -q |
Tiến hành cài Wazuh Agent lên máy Linux:
| curl -s https://packages.wazuh.com/key/GPG-KEY-WAZUH | gpg --no-default-keyring --keyring gnupg-ring:/usr/share/keyrings/wazuh.gpg --import && chmod 644 /usr/share/keyrings/wazuh.gpg echo "deb [signed-by=/usr/share/keyrings/wazuh.gpg] https://packages.wazuh.com/4.x/apt/ stable main" | tee -a /etc/apt/sources.list.d/wazuh.list apt-get update WAZUH_MANAGER="10.30.194.240" WAZUH_AGENT_GROUP="linux_agent" apt-get install wazuh-agent |
| systemctl daemon-reload systemctl enable wazuh-agent systemctl start wazuh-agent |
Kiểm tra xem agent đã enroll thành công chưa:


Chỉnh file config để cấp policy cho Linux Agent thu log theo yêu cầu: /var/ossec/etc/shared/linux_agent/agent.conf
| <agent_config> <localfile> <log_format>syslog</log_format> <location>/var/log/syslog</location> </localfile> <localfile> <location>journald</location> <log_format>journald</log_format> </localfile> <localfile> <location>journald</location> <log_format>journald</log_format> <filter field="_SYSTEMD_UNIT">^ssh.service$</filter> </localfile> <localfile> <location>journald</location> <log_format>journald</log_format> <filter field="_SYSTEMD_UNIT">^cron.service$</filter> <filter field="PRIORITY">[0-6]</filter> </localfile> <localfile> <location>journald</location> <log_format>journald</log_format> <filter field="_SYSTEMD_UNIT">^docker.service$</filter> </localfile> <localfile> <location>/var/log/auth.log</location> <log_format>syslog</log_format> </localfile> <labels> <label key="group">Linux_Agent</label> </labels> </agent_config> |
Kiểm tra xem Linux Agent đã được đồng bộ policy chưa:
| /var/ossec/bin/agent_groups -S -i <AGENT_ID> |
Sau đó thấy log của Linux Agent gửi thành công đến Wazuh Manager:

4. Cài Wazuh Agent cho thiết bị Windows
Tạo group cho Linux agent trên Wazuh Manager:
| /var/ossec/bin/agent_groups -a -g windows_agent -q |
Tải Windows Installer: https://packages.wazuh.com/4.x/windows/wazuh-agent-4.12.0-1.msi
Chạy lệnh:
| .\wazuh-agent-4.12.0-1.msi /q WAZUH_MANAGER="10.30.194.240" WAZUH_AGENT_GROUP="windows_agent"NET START Wazuh |
Kiểm tra xem agent đã enroll thành công chưa:


Chỉnh file config để cấp policy cho Windows Agent thu log theo yêu cầu: /var/ossec/etc/shared/linux_agent/agent.conf
| <agent_config> <!-- Shared agent configuration here --> <localfile> <location>Security</location> <log_format>eventchannel</log_format> </localfile> <localfile> <location>System</location> <log_format>eventchannel</log_format> </localfile> <localfile> <location>Application</location> <log_format>eventchannel</log_format> </localfile> <localfile> <location>Microsoft-Windows-Security-Auditing</location> <log_format>eventchannel</log_format> <query>Event/System[EventID=4624 or EventID=4625 or EventID=4634 or EventID=4647 or EventID=4672]</query> </localfile> <localfile> <location>Microsoft-Windows-TaskScheduler/Operational</location> <log_format>eventchannel</log_format> </localfile> <localfile> <location>C:\ProgramData\Docker\daemon.json</location> <log_format>json</log_format> </localfile> <localfile> <location>C:\Windows\System32\winevt\Logs\Microsoft-Windows-Sysmon-Operational.evtx</location> <log_format>eventchannel</log_format> </localfile> <labels> <label key="group">Windows_Agent</label> </labels> </agent_config> |
Kiểm tra xem Linux Agent đã được đồng bộ policy chưa:
| /var/ossec/bin/agent_groups -S -i <AGENT_ID> |
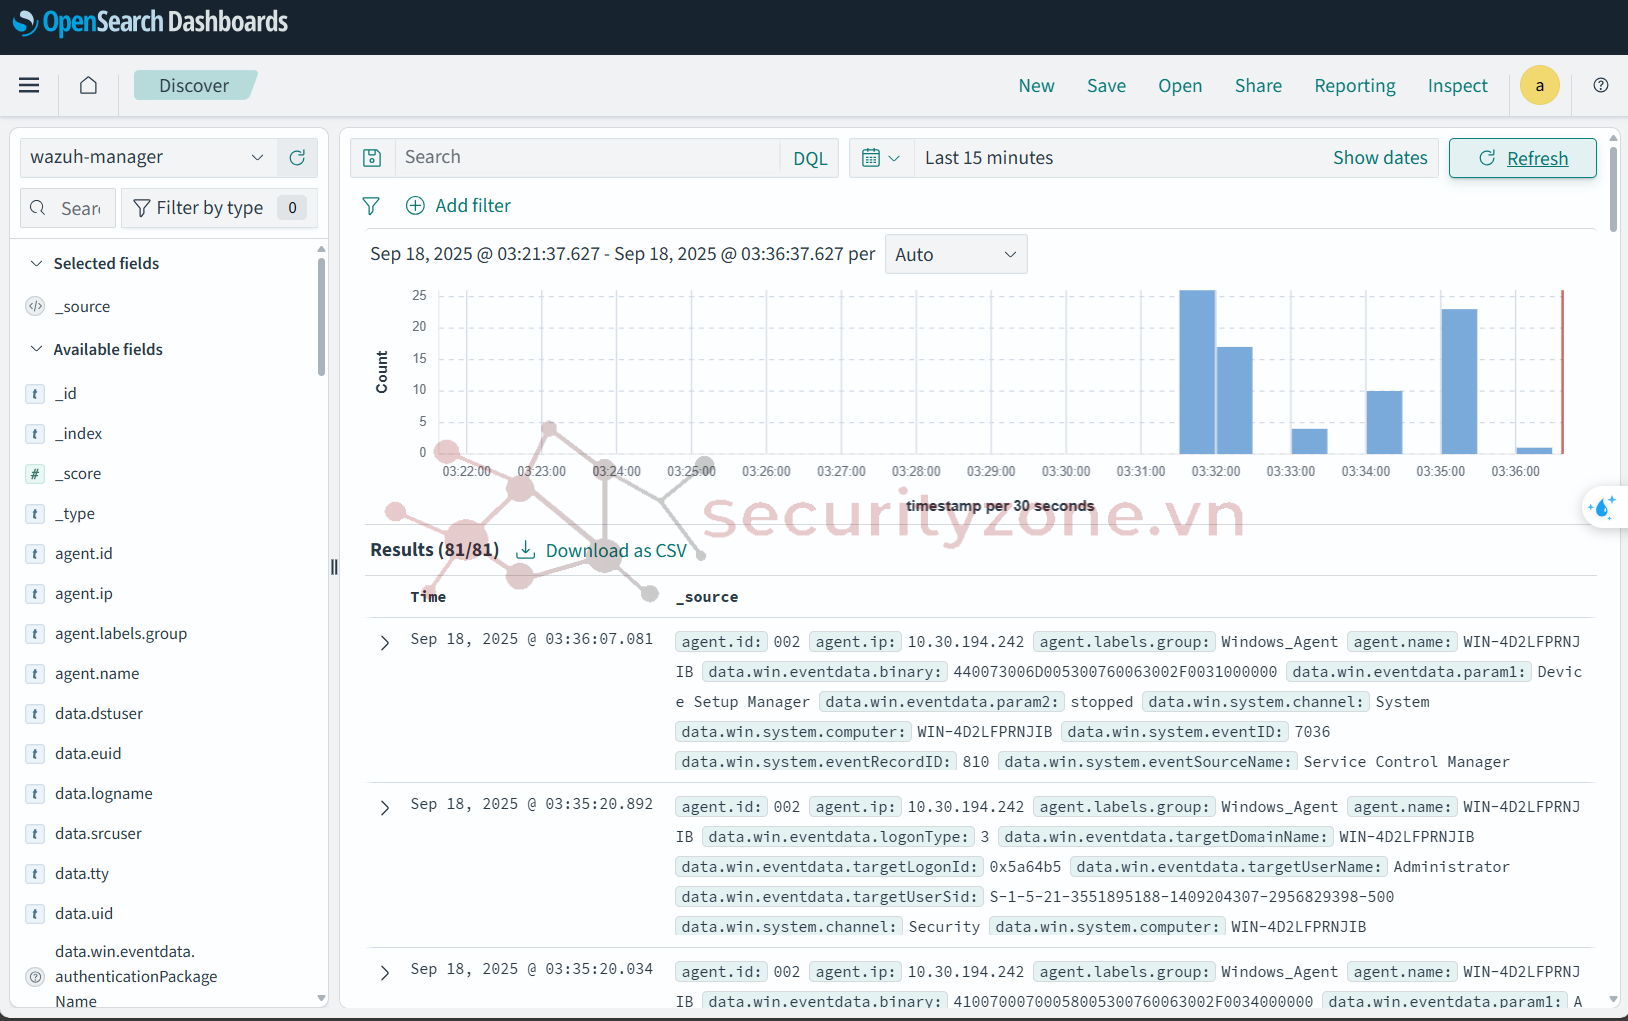
Sau đó thấy log của WindowsAgent gửi thành công đến Wazuh Manager:

Thành công thu thập log và hiện lên dashboard Opensearch:

Đính kèm
Sửa lần cuối: