Lê Gia Hoàng Thiện
Intern
1. Vector là gì?

- Vector được phát triển bởi Datadog, nhưng được cộng đồng sử dụng rộng rãi trong các hệ thống cloud-native, microservices, và môi trường Kubernetes.
2. Kiến trúc tổng quan của Vector

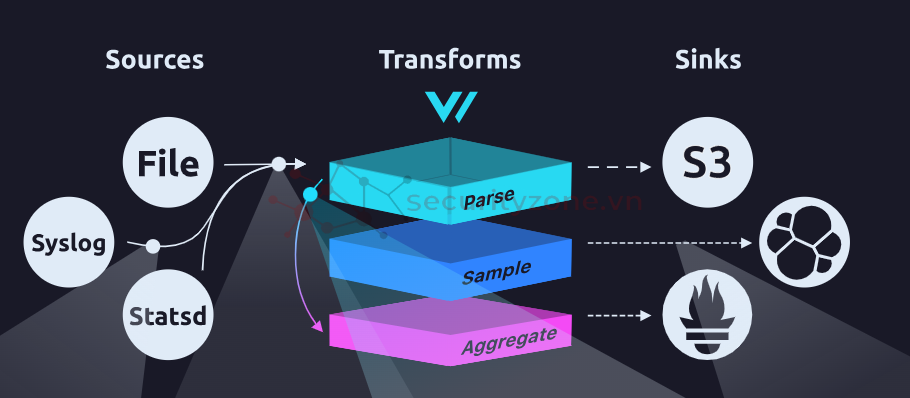
1. Sources – Điểm đầu vào dữ liệu
- Thu thập logs từ file, journald, syslog, container runtime (Docker, Kubernetes), hoặc metrics từ Prometheus, StatsD, Kafka…
- Hỗ trợ đa dạng giao thức, giúp dễ tích hợp.
- Parse dữ liệu (JSON, syslog, logfmt, regex).
- Lọc bỏ noise (filter).
- Thêm metadata (ví dụ: thông tin container, node, vùng).
- Chuẩn hóa dữ liệu (định dạng timestamp, cấu trúc JSON).
- Ẩn/mask dữ liệu nhạy cảm (PII, secrets).
- Có thể xây dựng pipeline nhiều bước liên tục.
- Gửi đến Elasticsearch/OpenSearch, Loki, Splunk, Kafka, S3, Prometheus…
- Có thể gửi song song đến nhiều đích, kèm theo cơ chế buffering + retry để đảm bảo không mất dữ liệu khi downstream bị sự cố.
- Viết bằng Rust: ngôn ngữ an toàn bộ nhớ, hiệu năng cao, tiêu tốn CPU/RAM thấp hơn rất nhiều so với Fluentd.
- Unified observability: Vector không chỉ xử lý logs mà còn metrics. Điều này giúp giảm số lượng agent phải cài trên node.
- Backpressure-aware: Nếu sink bị nghẽn, Vector sẽ tự động áp dụng cơ chế điều chỉnh tốc độ (throttling, buffering) để không bị mất dữ liệu
- Tự quan sát (self-observability): Vector có thể export chính metrics của nó ra Prometheus để bạn monitor hiệu năng và tình trạng hoạt động.
3. Fluent Bit và Fluentd – tiền bối của Vector
Fluent Bit- Là log forwarder nhẹ, viết bằng C.
- Điểm mạnh: cực kỳ nhẹ (có thể chạy ở edge node, IoT, sidecar trong container).
- Chủ yếu làm nhiệm vụ thu thập + forward logs; khả năng xử lý (filter/transform) có nhưng giới hạn.
- Thường dùng chung với Fluentd: Fluent Bit chạy ở agent (node), Fluentd chạy ở layer aggregator (centralized).
- Là log collector đầy đủ tính năng, viết bằng Ruby.
- Có hơn 2000 plugin cho đủ loại input, filter, output.
- Điểm mạnh: dễ mở rộng, cộng đồng đông đảo.
- Nhược điểm: nặng, tiêu tốn CPU/RAM, khó phù hợp cho môi trường giới hạn tài nguyên (IoT, container nhỏ).
4. So sánh Vector với Fluent Bit và Fluentd
| Tiêu chí | Vector | Fluent Bit | Fluentd |
| Ngôn ngữ | Rust | C | Ruby |
| Mức tiêu thụ tài nguyên | Thấp, tối ưu nhờ Rust | Rất thấp (nhẹ nhất) | Cao (nặng hơn nhiều) |
| Logs + Metrics | Có (native support) | Chỉ logs | Chỉ logs |
| Khả năng xử lý | Transforms đa dạng, mạnh mẽ | Filter cơ bản | Plugin phong phú |
| Tính mở rộng | Đang phát triển, ít plugin | Trung bình | Rất lớn (2000+ plugin) |
| Use case chính | Logs + Metrics, Kubernetes, cloud-native | Edge/IoT, sidecar, log forwarder | Aggregation, centralized logging |
| Độ phổ biến cộng đồng | Đang tăng nhanh | Rộng rãi | Rất rộng rãi |
5. Khi nào chọn Vector, Fluent Bit, hay Fluentd?
- Vector
- Khi bạn cần một công cụ thống nhất logs + metrics.
- Khi bạn muốn hiệu năng cao và ít tốn tài nguyên.
- Khi chạy trong Kubernetes hoặc hạ tầng cloud-native hiện đại.
- Fluent Bit:
- Khi cần một agent nhỏ gọn ở IoT, edge, hoặc container sidecar.
- Khi chỉ cần forward logs mà không cần nhiều xử lý phức tạp.
- Fluentd
- Khi bạn cần plugin đa dạng để tích hợp với hệ thống logging phức tạp.
- Khi chạy ở layer aggregator để gom logs từ nhiều Fluent Bit.
- Khi tổ chức đã quen với hệ sinh thái Fluent.
6. Mô hình căn bản về vector 1 server và 1 agent
6.1. Setup server (10.30.192.6)
Bước 1: Cài đặt docker và docker compose
sudo apt-get remove docker docker-engine docker.io containerd runc
sudo apt-get update
sudo apt-get install -y ca-certificates curl gnupg lsb-release
sudo mkdir -p /etc/apt/keyrings
curl -fsSL https://download.docker.com/linux/ubuntu/gpg | \
sudo gpg --dearmor -o /etc/apt/keyrings/docker.gpg
echo \
"deb [arch=$(dpkg --print-architecture) \
signed-by=/etc/apt/keyrings/docker.gpg] \
https://download.docker.com/linux/ubuntu \
$(lsb_release -cs) stable" | \
sudo tee /etc/apt/sources.list.d/docker.list > /dev/null
sudo apt-get update
sudo apt-get install -y docker-ce docker-ce-cli containerd.io docker-buildx-plugin docker-compose-plugin
sudo usermod -aG docker $USER
newgrp docker
Bước 2: Tạo file docker-compose.yaml
services:
opensearch-node1:
image: opensearchproject/opensearch:3
container_name: opensearch-node1
environment:
- cluster.name=opensearch-cluster
- node.name=opensearch-node1
- discovery.seed_hosts=opensearch-node1,opensearch-node2
- cluster.initial_cluster_manager_nodes=opensearch-node1,opensearch-node2
- bootstrap.memory_lock=true
- OPENSEARCH_JAVA_OPTS=-Xms512m -Xmx512m
- OPENSEARCH_INITIAL_ADMIN_PASSWORD=Password
ulimits: { memlock: { soft: -1, hard: -1 }, nofile: { soft: 65536, hard: 65536 } }
volumes: [ "opensearch-data1:/usr/share/opensearch/data" ]
networks: [ "opensearch-net" ]
ports: [ "9200:9200", "9600:9600" ]
healthcheck:
test: ["CMD", "curl", "-f", "-sS", "-u", "admin:Thien@123", "--insecure", "https://localhost:9200/_cluster/health"]
interval: 10s
timeout: 5s
retries: 10
opensearch-node2:
image: opensearchproject/opensearch:3
container_name: opensearch-node2
environment:
- cluster.name=opensearch-cluster
- node.name=opensearch-node2
- discovery.seed_hosts=opensearch-node1,opensearch-node2
- cluster.initial_cluster_manager_nodes=opensearch-node1,opensearch-node2
- bootstrap.memory_lock=true
- OPENSEARCH_JAVA_OPTS=-Xms512m -Xmx512m
- OPENSEARCH_INITIAL_ADMIN_PASSWORD=Password
ulimits: { memlock: { soft: -1, hard: -1 }, nofile: { soft: 65536, hard: 65536 } }
volumes: [ "opensearch-data2:/usr/share/opensearch/data" ]
networks: [ "opensearch-net" ]
healthcheck:
test: ["CMD", "curl", "-f", "-sS", "-u", "admin:Thien@123", "--insecure", "https://localhost:9200/_cluster/health"]
interval: 10s
timeout: 5s
retries: 10
opensearch-dashboards:
image: opensearchproject/opensearch-dashboards:3
container_name: opensearch-dashboards
environment:
OPENSEARCH_HOSTS: '["https://opensearch-node1:9200","https://opensearch-node2:9200"]'
ports: [ "5601:5601" ]
networks: [ "opensearch-net" ]
depends_on:
opensearch-node1: { condition: service_healthy }
opensearch-node2: { condition: service_healthy }
vector:
image: timberio/vector:nightly-2025-08-22-debian
container_name: vector
volumes:
- ./vector.yaml:/etc/vector/vector.yaml:ro
- vector-data:/vector-data-dir
networks: [ "opensearch-net" ]
ports: [ "6000:6000", "8686:8686" ]
depends_on:
opensearch-node1: { condition: service_healthy }
opensearch-node2: { condition: service_healthy }
networks:
opensearch-net:
volumes:
opensearch-data1:
opensearch-data2:
vector-data:
Bước 3: Tạo file vector.yaml và default.config cùng cấp
data_dir: "/vector-data-dir"
api:
enabled: true
address: "0.0.0.0:8686"
sources:
from_agents:
type: vector
address: "0.0.0.0:6000"
transforms:
ensure_index_and_tags:
type: remap
inputs: ["from_agents"]
source: |
host_id = get_hostname!()
if exists(.agent_ip) && is_string(.agent_ip) && length!(.agent_ip) > 0 {
host_id = .agent_ip
}
# Tạo index theo agent_ip/ngày
date_str = format_timestamp!(now(), "%Y.%m.%d")
idx_str, err = host_id + "-" + date_str
if err != null { idx_str = host_id }
.index_name = idx_str
.received_at = now()
if !exists(.source_type) { .source_type = "agent" }
sinks:
opensearch_sink:
type: elasticsearch
inputs: ["ensure_index_and_tags"]
endpoints:
- "https://opensearch-node1:9200"
- "https://opensearch-node2:9200"
api_version: "v7"
bulk:
index: "{{ index_name }}"
request:
concurrency: 2
auth:
strategy: basic
user: admin
password: Password
tls:
verify_certificate: false
verify_hostname: false
server {
listen 80;
listen [::]:80;
server_name localhost;
access_log /var/log/nginx/host.access.log main;
location / {
root /usr/share/nginx/html;
index index.html index.htm;
}
error_page 500 502 503 504 /50x.html;
location = /50x.html {
root /usr/share/nginx/html;
}
}
Bước 4: Tại thư mục chứa docker-compose.yml chạy docker compose up -d
6.2. Setup agent (10.30.192.7)
Bước 1: Tải vector và chạy chúng dưới nền dịch vụ
- Tạo system : sudo nano /etc/systemd/system/vector.servicecurl \
--proto '=https' \
--tlsv1.2 -O \
https://apt.vector.dev/pool/v/ve/vector_0.49.0-1_amd64.deb
sudo dpkg -i vector_0.49.0-1_amd64.deb
sudo apt-get install -f
sudo ln -s /usr/bin/vector /usr/local/bin/vector
vector –version
[Unit]
Description=Vector (standalone)
After=network.target
[Service]
ExecStart=/usr/local/bin/vector -c /etc/vector/vector.yaml
Restart=always
User=root
LimitNOFILE=10240
LimitNPROC=512
[Install]
WantedBy=multi-user.target
Bước 2: Tạo file thu thập dữ liệu của agent.
sudo mkdir -p /opt/vector
sudo tee /opt/vector/agent_facts.sh >/dev/null <<'EOF'
#!/usr/bin/env bash
set -euo pipefail
ip_addr=$(ip -4 addr show scope global 2>/dev/null | awk '/inet /{print $2}' | sed 's#/.*##' | head -n1)
[ -z "${ip_addr:-}" ] && ip_addr=$(hostname -I 2>/dev/null | awk '{print $1}')
[ -z "${ip_addr:-}" ] && ip_addr=$(hostname)
cpu_cores=$(nproc --all 2>/dev/null || echo 0)
read load1 load5 load15 _ < /proc/loadavg
mem_total=$(awk '/MemTotal/ {print $2*1024}' /proc/meminfo)
mem_avail=$(awk '/MemAvailable/ {print $2*1024}' /proc/meminfo)
mem_used=$((mem_total - mem_avail))
mem_used_pct=$(awk -v u=$mem_used -v t=$mem_total 'BEGIN{if(t>0) printf "%.2f", (u/t)*100; else print "0"}')
read dtotal dused <<<"$(df -B1 -x tmpfs -x devtmpfs --total | awk 'END{print $2, $3}')"
: "${dtotal:=0}"; : "${dused:=0}"
disk_used_pct=$(awk -v u=$dused -v t=$dtotal 'BEGIN{if(t>0) printf "%.2f", (u/t)*100; else print "0"}')
os_name=$(. /etc/os-release 2>/dev/null; echo "${PRETTY_NAME:-Linux}")
kernel=$(uname -r)
host=$(hostname)
uptime=$(awk '{print int($1)}' /proc/uptime)
ts=$(date -Iseconds)
printf '{"event":"agent_facts","agent_ip":"%s","host":"%s","os":"%s","kernel":"%s","cpu_cores":%s,"load_1":%s,"load_5":%s,"load_15":%s,"mem_total_bytes":%s,"mem_used_bytes":%s,"mem_used_percent":%s,"disk_total_bytes":%s,"disk_used_bytes":%s,"disk_used_percent":%s,"uptime_seconds":%s,"timestamp":"%s"}\n' \
"$ip_addr" "$host" "$os_name" "$kernel" "$cpu_cores" "$load1" "$load5" "$load15" "$mem_total" "$mem_used" "$mem_used_pct" "$dtotal" "$dused" "$disk_used_pct" "$uptime" "$ts"
EOF
sudo chmod +x /opt/vector/agent_facts.sh
# Thử chạy thử (nên thấy 1 dòng JSON)
bash /opt/vector/agent_facts.sh
Bước 3: Tạo file config: sudo nano /etc/vector/vector.yaml
data_dir: "/var/lib/vector"
sources:
agent_facts:
type: exec
mode: scheduled
scheduled:
exec_interval_secs: 5
command: ["/opt/vector/agent_facts.sh"]
decoding:
codec: json
transforms:
add_agent_tags:
type: remap
inputs: ["agent_facts"]
source: |
.source = "vector-agent"
if !exists(.agent_ip) || is_null(.agent_ip) || (is_string(.agent_ip) && length!(.agent_ip) == 0) {
.agent_ip = get_hostname!()
}
sinks:
to_vector_server:
type: vector
inputs: ["add_agent_tags"]
address: "10.30.192.6:6000"
Bước 4: Chạy dịch vụ
sudo systemctl daemon-reload
sudo systemctl enable vector
sudo systemctl start vector
Kết quả:
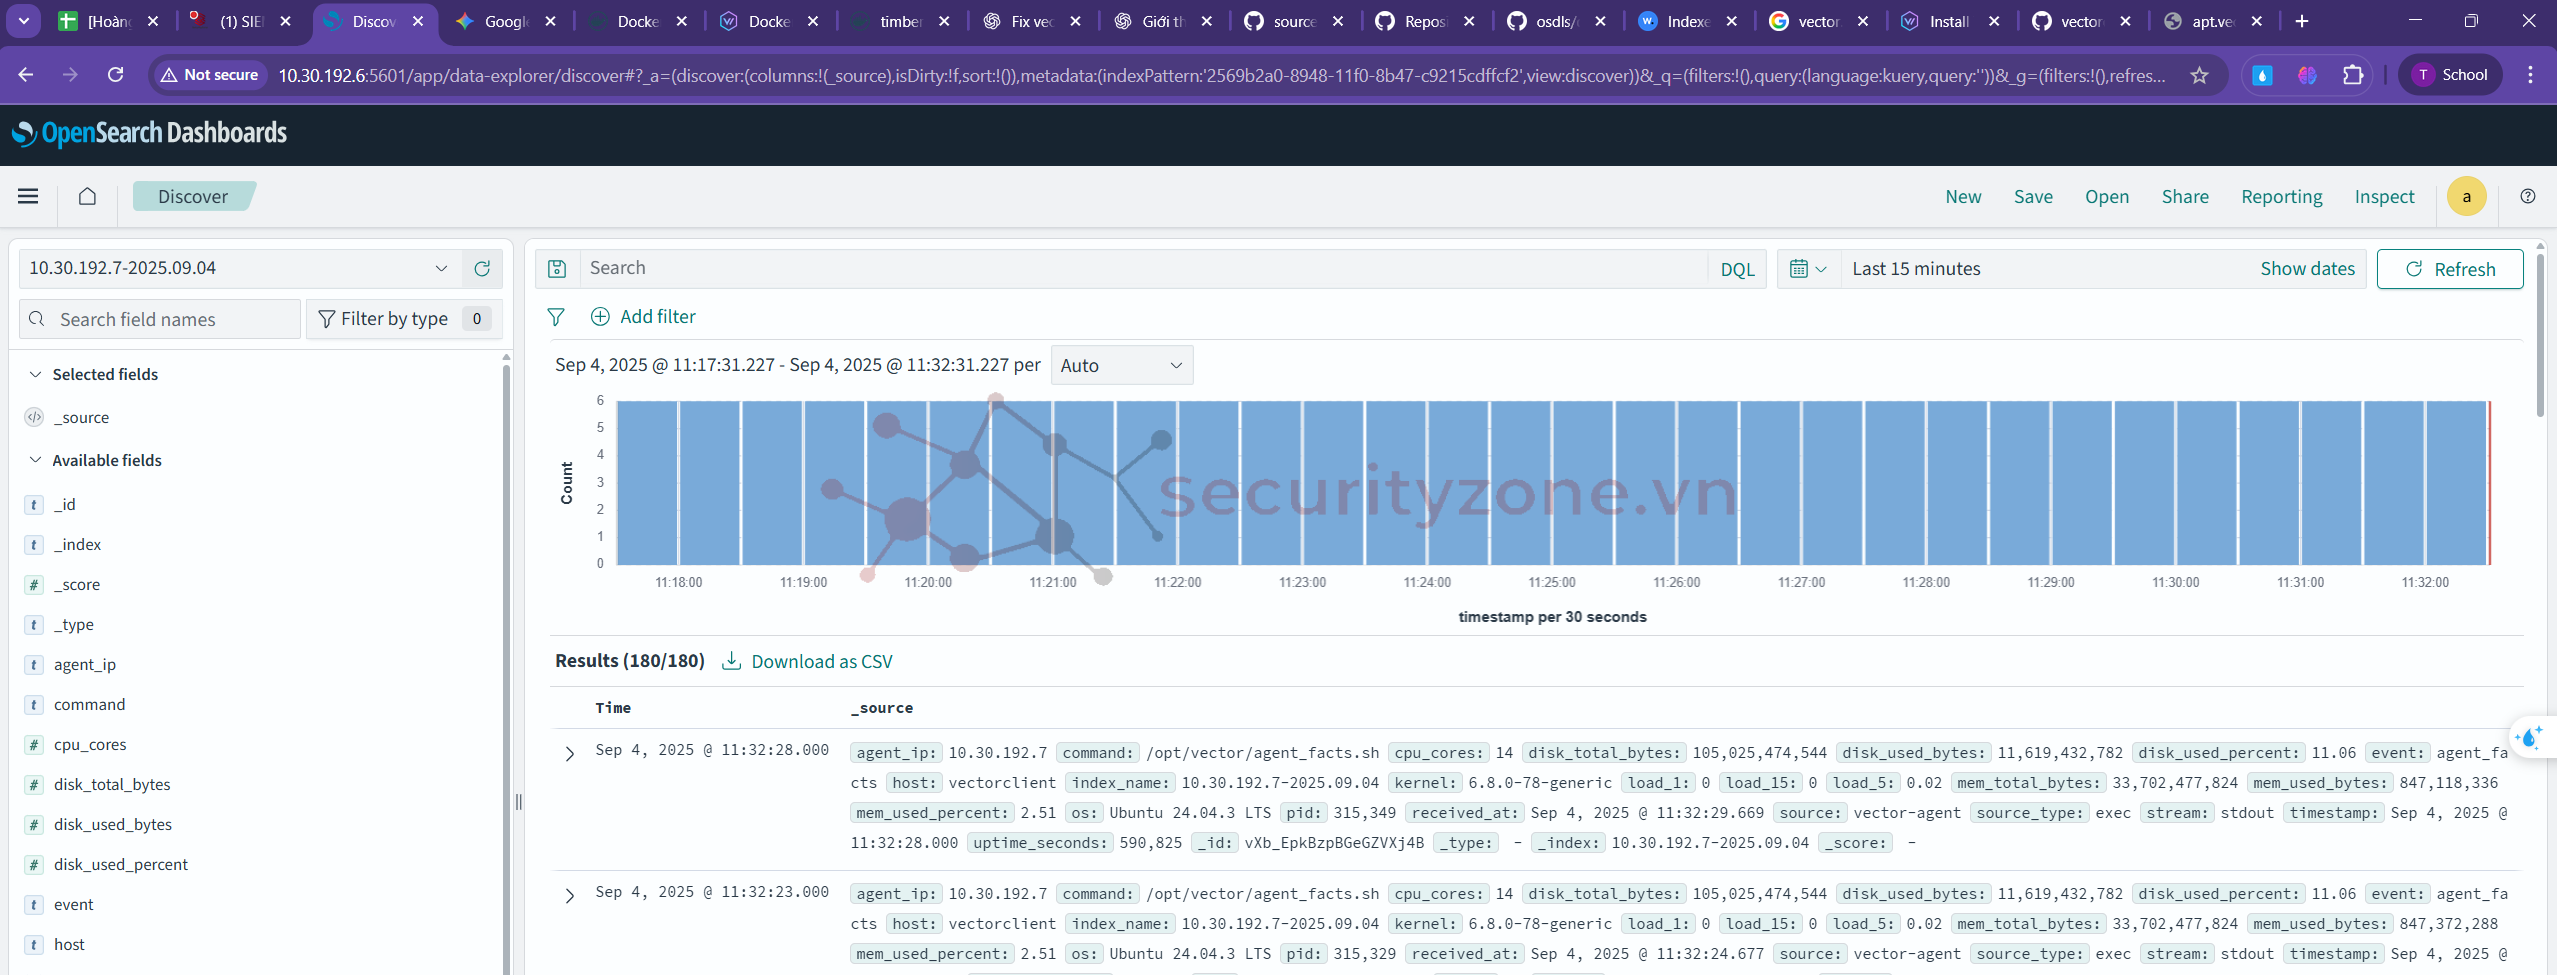
- Cài đặt được opensearch trên server để quan sát các logs được vector server thu thập từ các agent

Bài viết liên quan
Được quan tâm
Bài viết mới