ThuanLeHiep
Intern
1 Mô hình hệ thống
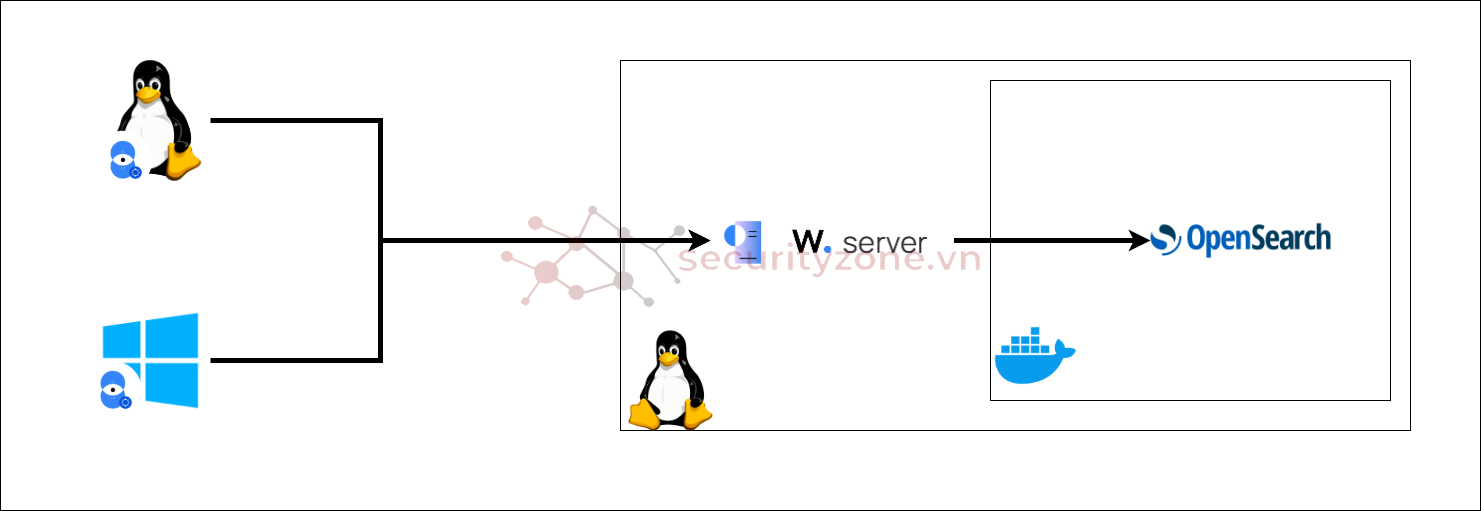
Thành phần hệ thống
- Endpoint Agents
- Cài đặt Wazuh Agent
- Linux Agent: Thu thập log và sự kiện từ máy Linux
- Windows Agent: Thu thập log và sự kiện từ máy Windows
- Nhận log/sự kiện từ các agent (Linux/Windows)
- Quản lý tập trung các agent
2 Cách triển khai
2.1 Trên máy Linux manager (10.30.194.108)Cài đặt Wazuh Manager theo Wazuh document
apt-get install gnupg apt-transport-https
curl -s https://packages.wazuh.com/key/GPG-KEY-WAZUH | gpg --no-default-keyring --keyring gnupg-ring:/usr/share/keyrings/wazuh.gpg --import && chmod 644 /usr/share/keyrings/wazuh.gpg
echo "deb [signed-by=/usr/share/keyrings/wazuh.gpg] https://packages.wazuh.com/4.x/apt/ stable main" | tee -a /etc/apt/sources.list.d/wazuh.list
apt-get update
apt-get -y install wazuh-manager
Tạo file docker-compose.yaml cho opensearch và fluentd
version: "3.8"
services:
# --- OpenSearch Node 1 ---
opensearch-node1:
image: opensearchproject/opensearch:3
container_name: opensearch-node1
environment:
- cluster.name=opensearch-cluster
- node.name=opensearch-node1
- discovery.seed_hosts=opensearch-node1,opensearch-node2
- cluster.initial_cluster_manager_nodes=opensearch-node1,opensearch-node2
- bootstrap.memory_lock=true
- OPENSEARCH_JAVA_OPTS=-Xms512m -Xmx512m
- OPENSEARCH_INITIAL_ADMIN_PASSWORD=Thuan@123
ulimits:
memlock:
soft: -1
hard: -1
nofile:
soft: 65536
hard: 65536
volumes:
- opensearch-data1:/usr/share/opensearch/data
ports:
- "9200:9200"
- "9600:9600"
networks:
- opensearch-net
# --- OpenSearch Node 2 ---
opensearch-node2:
image: opensearchproject/opensearch:3
container_name: opensearch-node2
environment:
- cluster.name=opensearch-cluster
- node.name=opensearch-node2
- discovery.seed_hosts=opensearch-node1,opensearch-node2
- cluster.initial_cluster_manager_nodes=opensearch-node1,opensearch-node2
- bootstrap.memory_lock=true
- OPENSEARCH_JAVA_OPTS=-Xms512m -Xmx512m
- OPENSEARCH_INITIAL_ADMIN_PASSWORD=Thuan@123
ulimits:
memlock:
soft: -1
hard: -1
nofile:
soft: 65536
hard: 65536
volumes:
- opensearch-data2:/usr/share/opensearch/data
networks:
- opensearch-net
# --- OpenSearch Dashboards ---
opensearch-dashboards:
image: opensearchproject/opensearch-dashboards:3
container_name: opensearch-dashboards
ports:
- "5601:5601"
environment:
OPENSEARCH_HOSTS: '["https://opensearch-node1:9200","https://opensearch-node2:9200"]'
networks:
- opensearch-net
# --- Nginx ---
nginx:
image: nginx:1.27.4-alpine
container_name: nginx
ports:
- "8080:80"
volumes:
- nginx-logs:/var/log/nginx
- ./default.conf:/etc/nginx/conf.d/default.conf
networks:
- opensearch-net
# --- Fluentd ---
fluentd:
image: fluent/fluentd:v1.17-debian
container_name: fluentd
user: root
command: >
sh -c "gem install fluent-plugin-opensearch &&
fluentd -c /fluentd/etc/fluent.conf"
volumes:
- nginx-logs:/var/log/fluentd
- ./fluent.conf:/fluentd/etc/fluent.conf
environment:
- FLUENTD_CONF=fluent.conf
ports:
- "24224:24224"
- "24225:24225"
- "24226:24226"
- "514:514/udp"
networks:
- opensearch-net
volumes:
opensearch-data1:
opensearch-data2:
nginx-logs:
fluentd-ui-data:
networks:
opensearch-net:
Tạo file config cho fluentd
# ==========================
# --- Host Linux ---
# ==========================
<source>
@type forward
@id in_forward_linux
port 24224
bind 0.0.0.0
tag linux
</source>
<match linux.**>
@type opensearch
@id out_os_linux
@log_level info
include_tag_key true
host opensearch-node1
port 9200
scheme https
ssl_verify false
ssl_version TLSv1_2
user admin
password Thuan@123
index_name fluentd_linux
logstash_format false
include_timestamp true
time_key_format %Y-%m-%dT%H:%M:%S.%N%z
time_key time
<buffer>
flush_thread_count 1
flush_mode interval
flush_interval 10s
chunk_limit_size 8M
total_limit_size 512M
retry_max_interval 30
retry_timeout 72h
retry_forever false
</buffer>
</match>
# ==========================
# --- Host Windows ---
# ==========================
<source>
@type forward
@id in_forward_win
port 24225
bind 0.0.0.0
tag win
</source>
<match win.**>
@type opensearch
@id out_os_win
@log_level info
include_tag_key true
host opensearch-node1
port 9200
scheme https
ssl_verify false
ssl_version TLSv1_2
user admin
password Thuan@123
index_name fluentd_win
logstash_format false
include_timestamp true
time_key_format %Y-%m-%dT%H:%M:%S.%N%z
time_key time
<buffer>
flush_thread_count 1
flush_mode interval
flush_interval 10s
chunk_limit_size 8M
total_limit_size 512M
retry_max_interval 30
retry_timeout 72h
retry_forever false
</buffer>
</match>
# ==========================
# --- Wazuh Alerts ---
# ==========================
<source>
@type forward
@id in_forward_wazuh
port 24226
bind 0.0.0.0
tag wazuh
</source>
<match wazuh.**>
@type opensearch
@id out_os_wazuh
@log_level info
include_tag_key true
host opensearch-node1
port 9200
scheme https
ssl_verify false
ssl_version TLSv1_2
user admin
password Thuan@123
index_name wazuh_alerts
logstash_format false
include_timestamp true
time_key_format %Y-%m-%dT%H:%M:%S.%N%z
time_key time
<buffer>
flush_thread_count 1
flush_mode interval
flush_interval 10s
chunk_limit_size 8M
total_limit_size 512M
retry_max_interval 30
retry_timeout 72h
retry_forever false
</buffer>
</match>
# ==========================
# --- pfSense Firewall ---
# ==========================
<source>
@type syslog
@id in_syslog_pfsense
port 514
bind 0.0.0.0
tag pfsense
protocol_type udp # hoặc tcp nếu bạn muốn nhận bằng TCP
</source>
<match pfsense.**>
@type opensearch
@id out_os_pfsense
@log_level info
include_tag_key true
host opensearch-node1
port 9200
scheme https
ssl_verify false
ssl_version TLSv1_2
user admin
password Thuan@123
index_name fluentd_pfsense
logstash_format false
include_timestamp true
time_key_format %Y-%m-%dT%H:%M:%S.%N%z
time_key time
<buffer>
flush_thread_count 1
flush_mode interval
flush_interval 10s
chunk_limit_size 8M
total_limit_size 512M
retry_max_interval 30
retry_timeout 72h
retry_forever false
</buffer>
</match>
Tạo file default.conf
server {
listen 80;
listen [::]:80;
server_name localhost;
access_log /var/log/nginx/host.access.log main;
location / {
root /usr/share/nginx/html;
index index.html index.htm;
}
error_page 500 502 503 504 /50x.html;
location = /50x.html {
root /usr/share/nginx/html;
}
}
Cài đặt fluent-bit
curl https://raw.githubusercontent.com/fluent/fluent-bit/master/install.sh | sh
#File config của fluentbit để lấy log từ wazuh gửi sang opensearch
[SERVICE]
# Flush
# =====
# set an interval of seconds before to flush records to a destination
flush 1
# Daemon
# ======
# instruct Fluent Bit to run in foreground or background mode.
daemon off
# Log_Level
# =========
# Set the verbosity level of the service, values can be:
#
# - error
# - warning
# - info
# - debug
# - trace
#
# by default 'info' is set, that means it includes 'error' and 'warning'.
log_level info
# Parsers File
# ============
# specify an optional 'Parsers' configuration file
parsers_file parsers.conf
# Plugins File
# ============
# specify an optional 'Plugins' configuration file to load external plugins.
plugins_file plugins.conf
# HTTP Server
# ===========
# Enable/Disable the built-in HTTP Server for metrics
http_server on
http_listen 0.0.0.0
http_port 2020
# Storage
# =======
# Fluent Bit can use memory and filesystem buffering based mechanisms
#
# - https://docs.fluentbit.io/manual/administration/buffering-and-storage
#
# storage metrics
# ---------------
# publish storage pipeline metrics in '/api/v1/storage'. The metrics are
# exported only if the 'http_server' option is enabled.
#
storage.metrics on
# storage.path
# ------------
# absolute file system path to store filesystem data buffers (chunks).
#
# storage.path /tmp/storage
# storage.sync
# ------------
# configure the synchronization mode used to store the data into the
# filesystem. It can take the values normal or full.
#
# storage.sync normal
# storage.checksum
# ----------------
# enable the data integrity check when writing and reading data from the
# filesystem. The storage layer uses the CRC32 algorithm.
#
# storage.checksum off
# storage.backlog.mem_limit
# -------------------------
# if storage.path is set, Fluent Bit will look for data chunks that were
# not delivered and are still in the storage layer, these are called
# backlog data. This option configure a hint of maximum value of memory
# to use when processing these records.
#
# storage.backlog.mem_limit 5M
[INPUT]
Name tail
Tag wazuh.*
Path /var/ossec/logs/archives/archives.json
Parser json
Mem_Buf_Limit 5MB
Skip_Long_Lines On
[OUTPUT]
name forward
match wazuh.*
host 127.0.0.1
port 24226
2.2 Cài đặt trên agent Linux
Cài đặt wazuh-agent theo document của Wazuh
curl -s https://packages.wazuh.com/key/GPG-KEY-WAZUH | gpg --no-default-keyring --keyring gnupg-ring:/usr/share/keyrings/wazuh.gpg --import && chmod 644 /usr/share/keyrings/wazuh.gpg
echo "deb [signed-by=/usr/share/keyrings/wazuh.gpg] https://packages.wazuh.com/4.x/apt/ stable main" | tee -a /etc/apt/sources.list.d/wazuh.list
apt-get update
WAZUH_MANAGER="<IP_Manager>" apt-get install wazuh-agent
Sau đó quay về máy wazuh manager chạy /var/ossec/bin/manage_agents

Kiểm tra xem agents sau khi cài đặt đã hiển thị trên manager (nếu chưa kiểm tra /var/ossec/etc/ossec.conf xem đã có IP của manager chưa nếu chưa thì thêm vào sau đó restart wazuh agent lại)
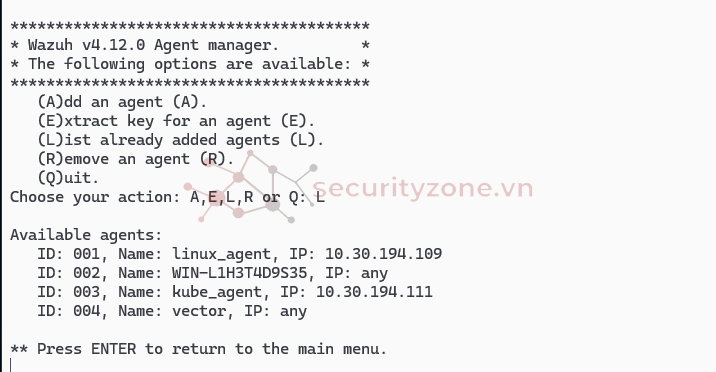
Tiến hành tạo group cho wazuh agent ( Group mặc định cho tất cả agent là default, khuyến khích tạo thêm group mới cho agent tùy thuộc theo nhu cầu )
Dùng lệnh /var/ossec/bin/agent_groups -a -g <Tên group bạn muốn tạo>
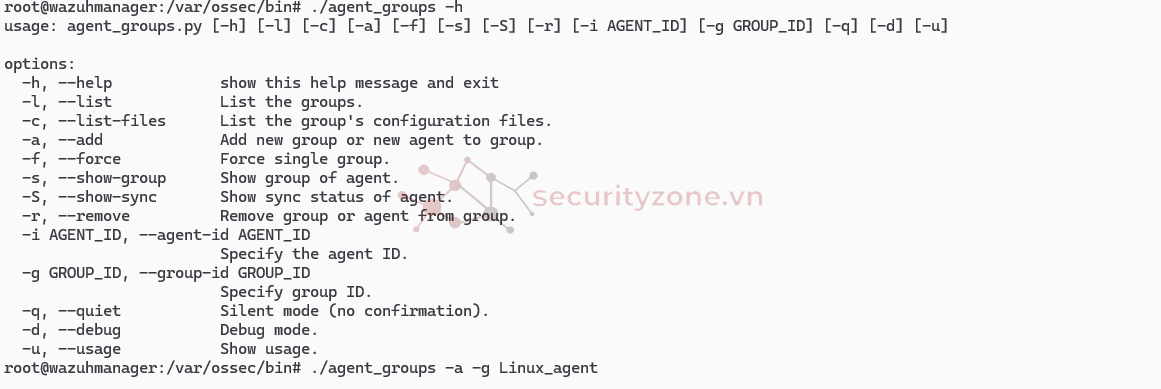
Thêm agent vào trong group /var/ossec/bin/agent_groups -a -i <id của agent> -g <Tên group bạn muốn tạo>

Sau đó vào /var/ossec/etc/shared/<Tên group đã tạo>/agent.conf
<agent_config>
<localfile>
<log_format>syslog</log_format>
<location>/var/log/syslog</location>
</localfile>
<localfile>
<location>journald</location>
<log_format>journald</log_format>
</localfile>
<localfile>
<location>journald</location>
<log_format>journald</log_format>
<filter field="_SYSTEMD_UNIT">^ssh.service$</filter>
</localfile>
<localfile>
<location>journald</location>
<log_format>journald</log_format>
<filter field="_SYSTEMD_UNIT">^cron.service$</filter>
<filter field="PRIORITY">[0-6]</filter>
</localfile>
<localfile>
<location>journald</location>
<log_format>journald</log_format>
<filter field="_SYSTEMD_UNIT">^docker.service$</filter>
</localfile>
<localfile>
<location>/var/log/auth.log</location>
<log_format>syslog</log_format>
</localfile>
<labels>
<label key="group">Linux_Agent</label>
</labels>
</agent_config>
Qua máy agent kiểm tra /var/ossec/etc/shared/agent.conf xem config đã qua chưa
Truy cập vào http://IP_manager:5601/
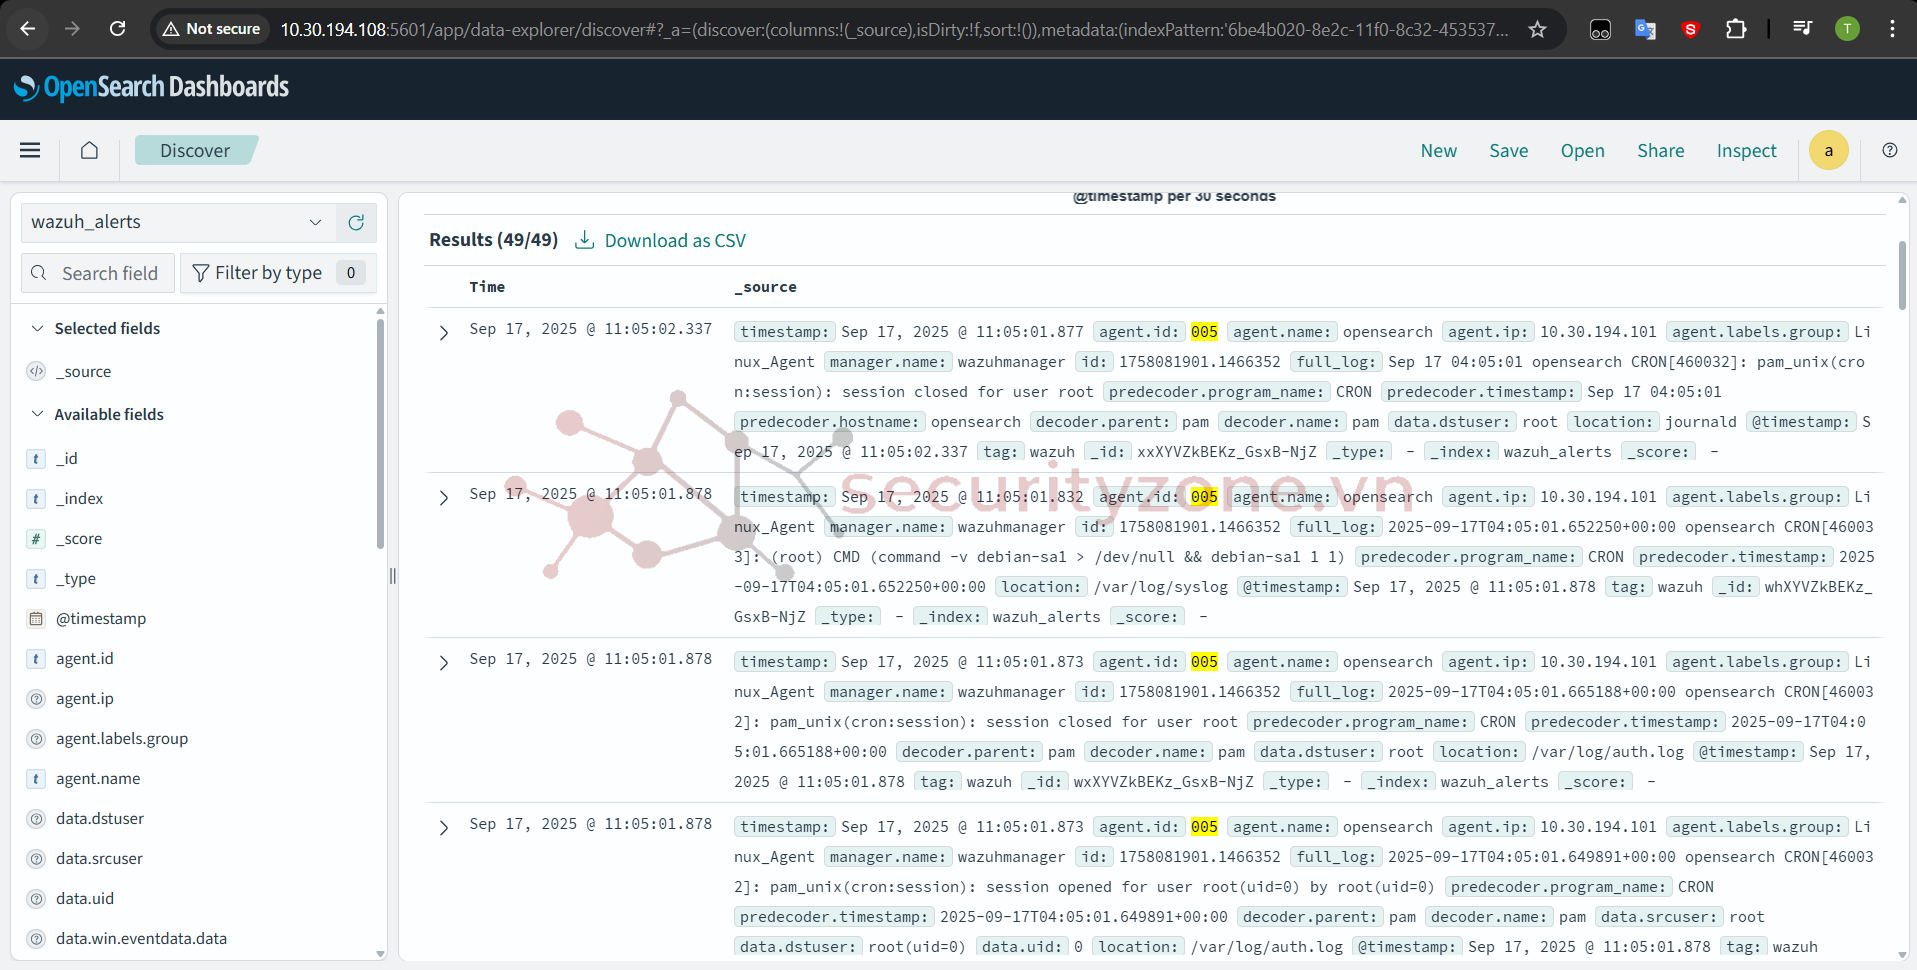
Search kiểm tra xem agent.id đã gửi log về chưa
2.2 Cài đặt trên agent Windows
Tải file wazuh-agent theo link
Đang tải…
packages.wazuh.com
Sau đó thực hiện các lệnh
wazuh-agent-4.12.0-1.msi /q WAZUH_MANAGER="IP_Manager"
NET START Wazuh
Kiểm tra trên máy manager
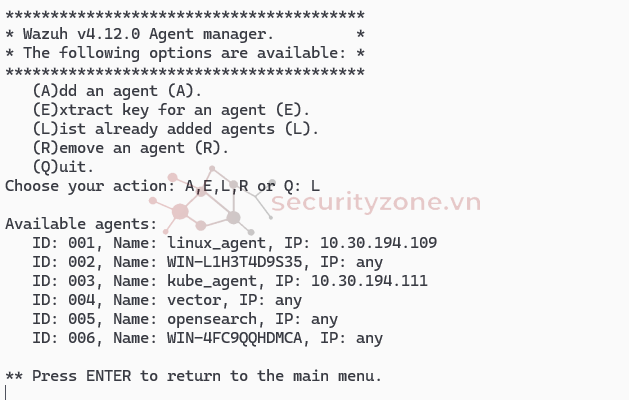
Thêm agent vào group windows

Thêm config cho group windows
Kiểm tra trên máy windows xem config đã đưa vào agent chưa<agent_config>
<localfile>
<log_format>eventchannel</log_format>
<location>Security</location>
</localfile>
<localfile>
<log_format>eventchannel</log_format>
<location>System</location>
</localfile>
<localfile>
<log_format>eventchannel</log_format>
<location>Application</location>
</localfile>
<labels>
<label key="group">windows</label>
</labels>
</agent_config>
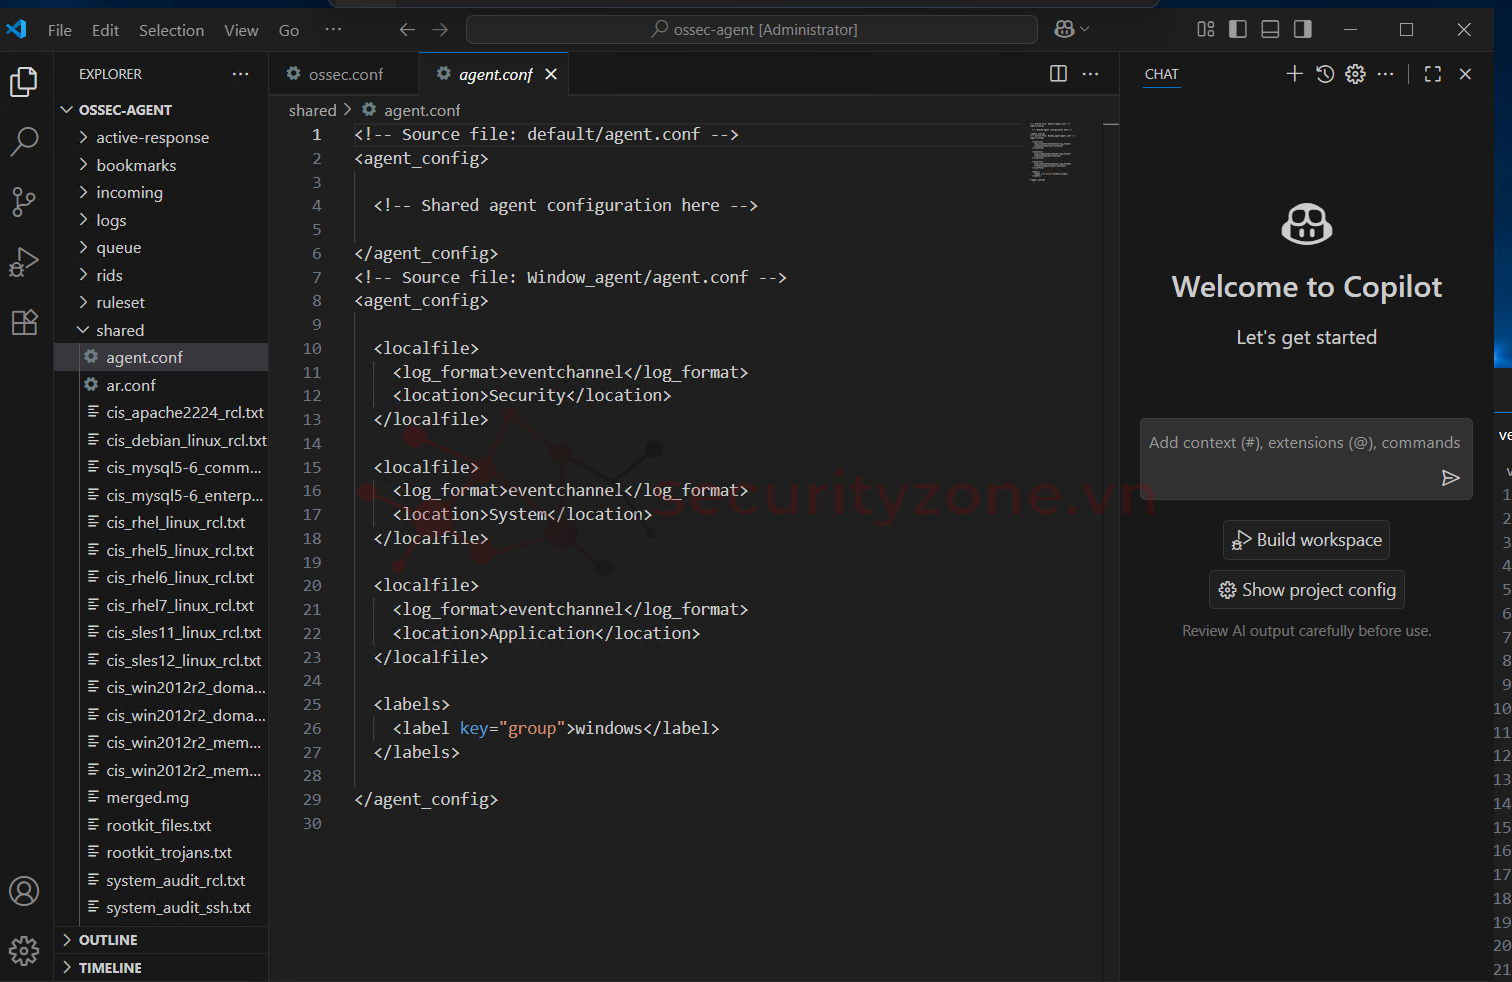
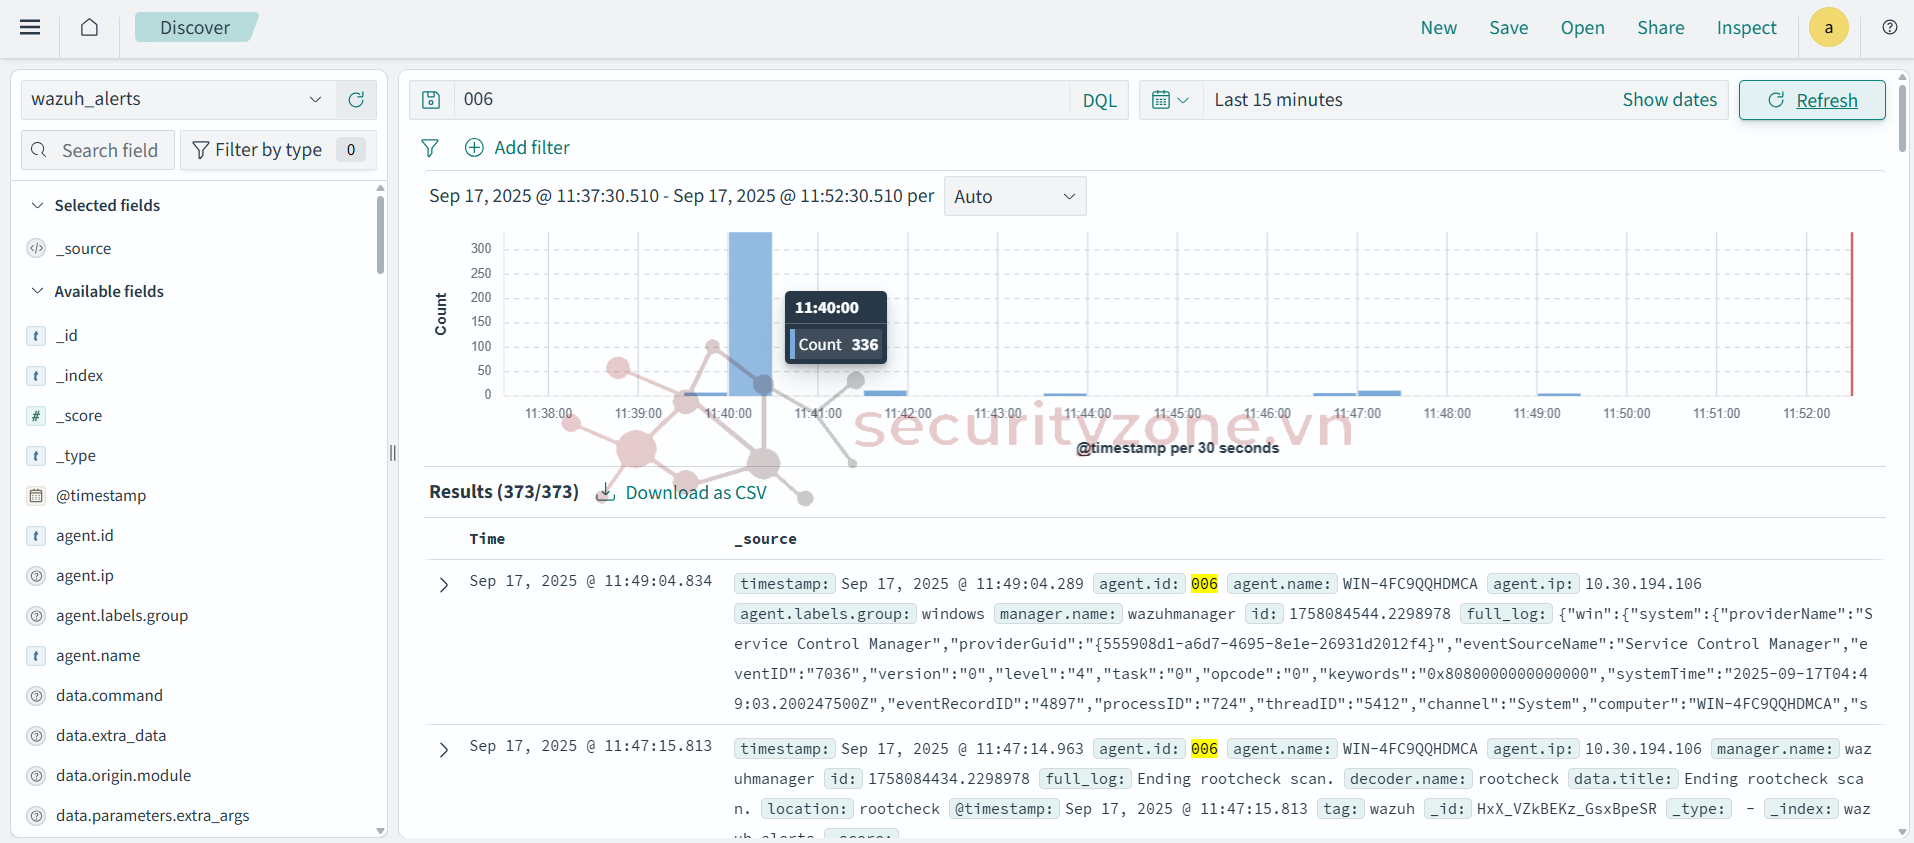
Kiểm tra trên dashboard của opensearch
Bài viết liên quan
Được quan tâm
Bài viết mới